logo
This guide provides step-by-step instructions for implementing additional events and parameters in your GA4 property. These enhancements are designed to improve the performance of both your attribution models and machine learning (ML) model.

Parameter setup

To improve the performance of your ML model and attribution, it’s necessary to implement the tracking of several event parameters and user properties in Google Analytics.

General Steps

  1. Pass the Parameter to dataLayer: For each event or user property, pass the relevant parameter (e.g., user_id, ip_address, ever_paid, is_first_purchase etc.) to your dataLayer.
  1. Send the parameter to Google Analytics via Google Tag Manager (GTM) or gtag.js:
      • For GA4 via Tag Manager:
        • Tracking user properties:
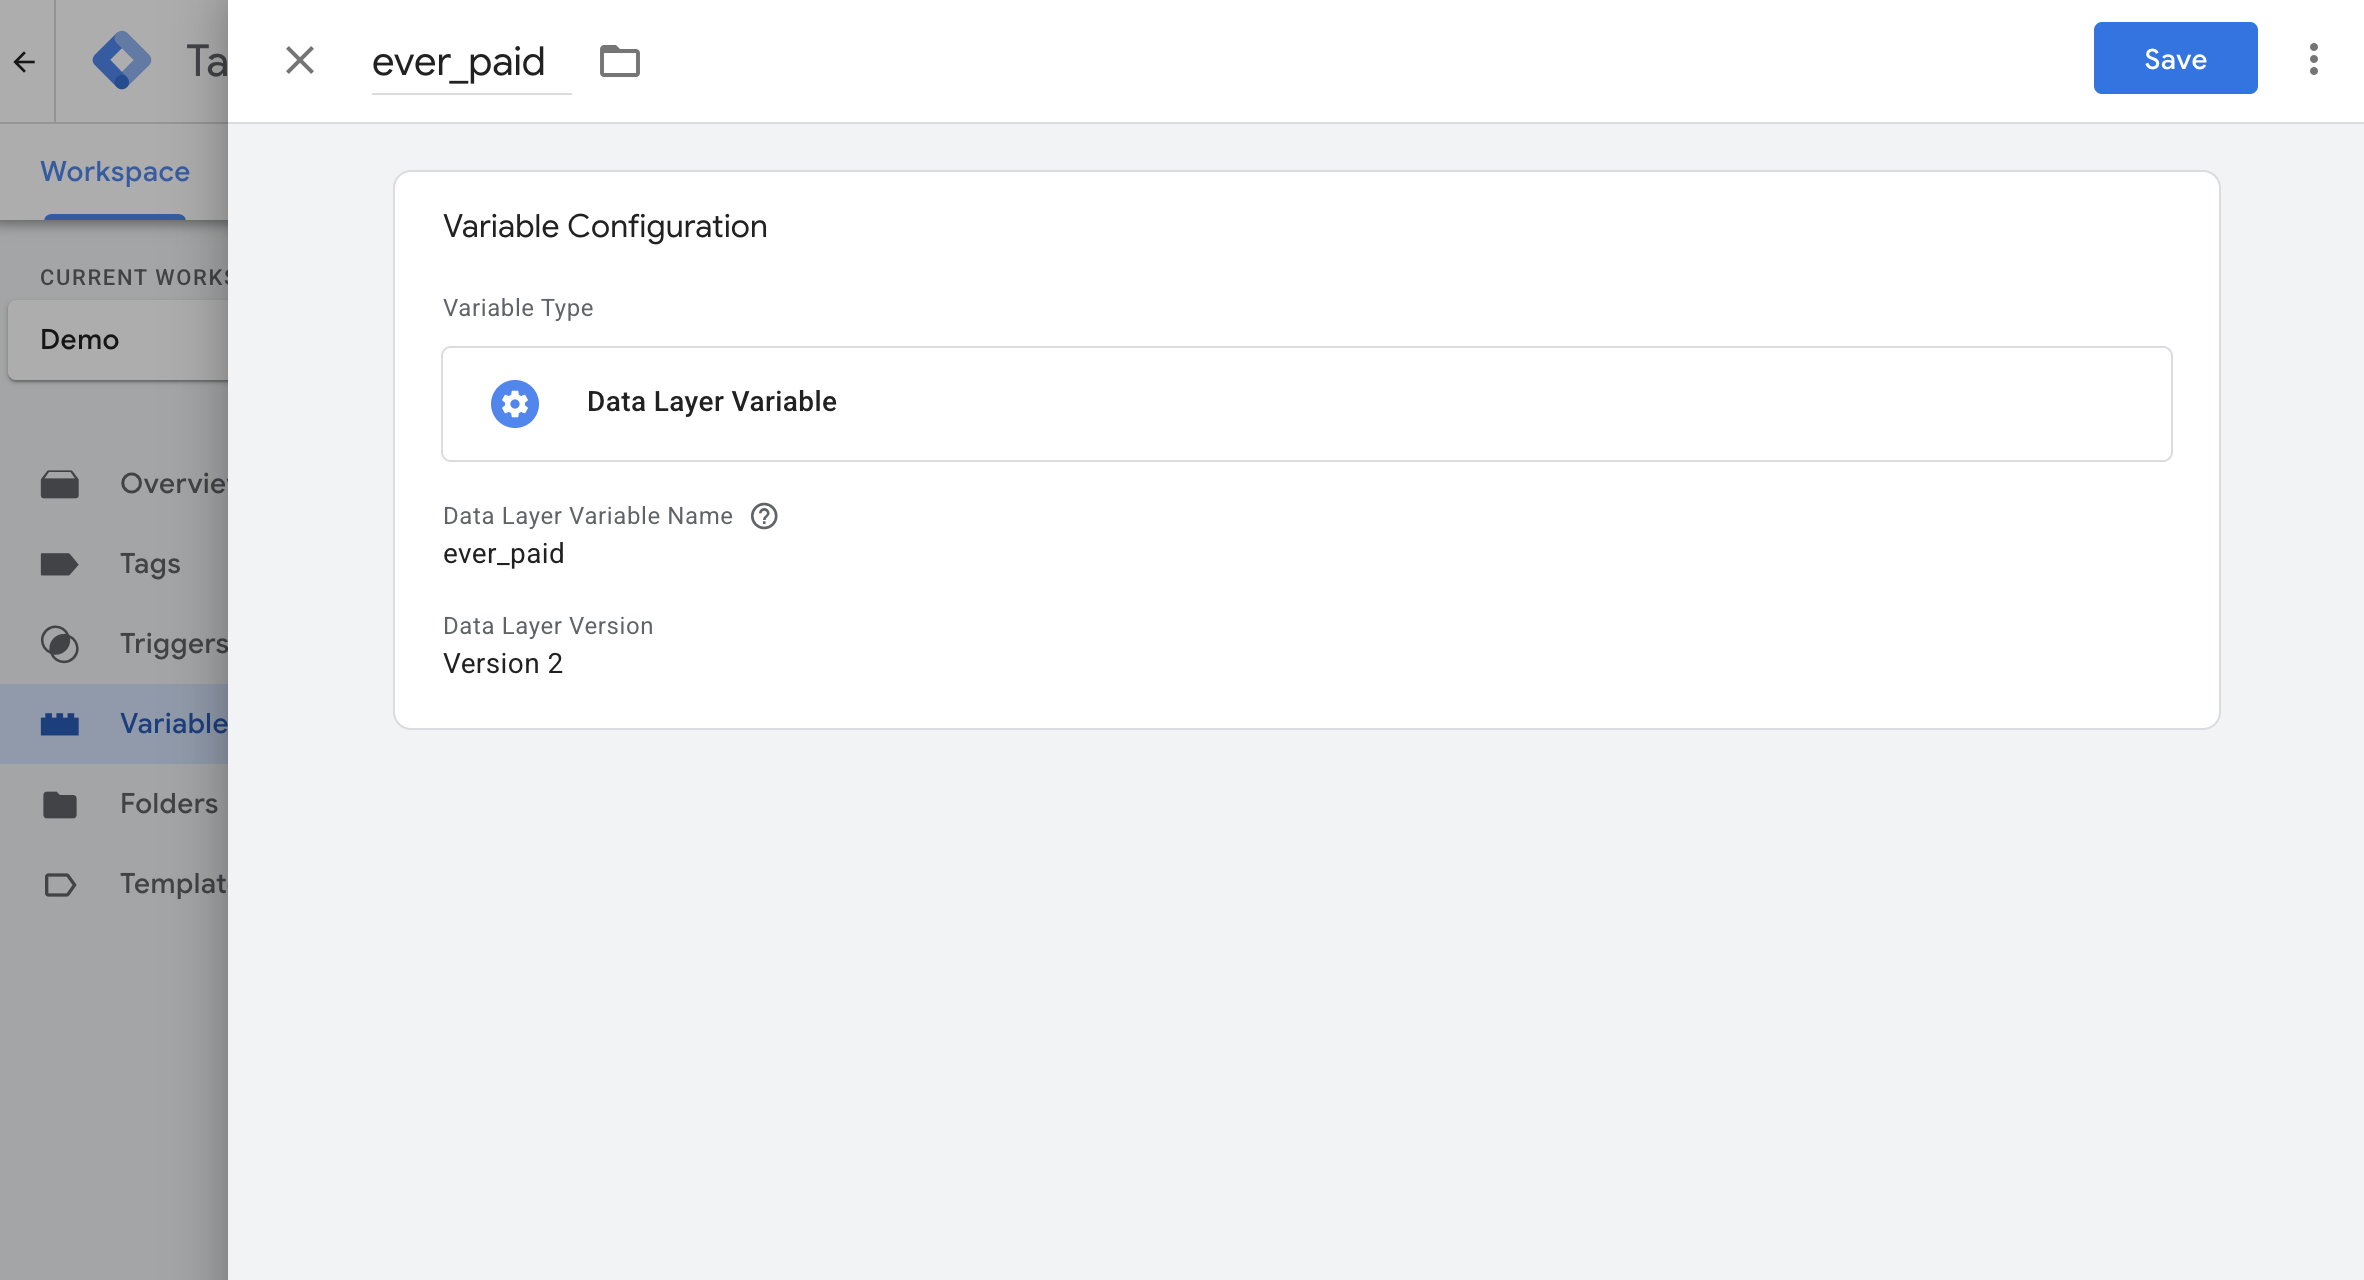
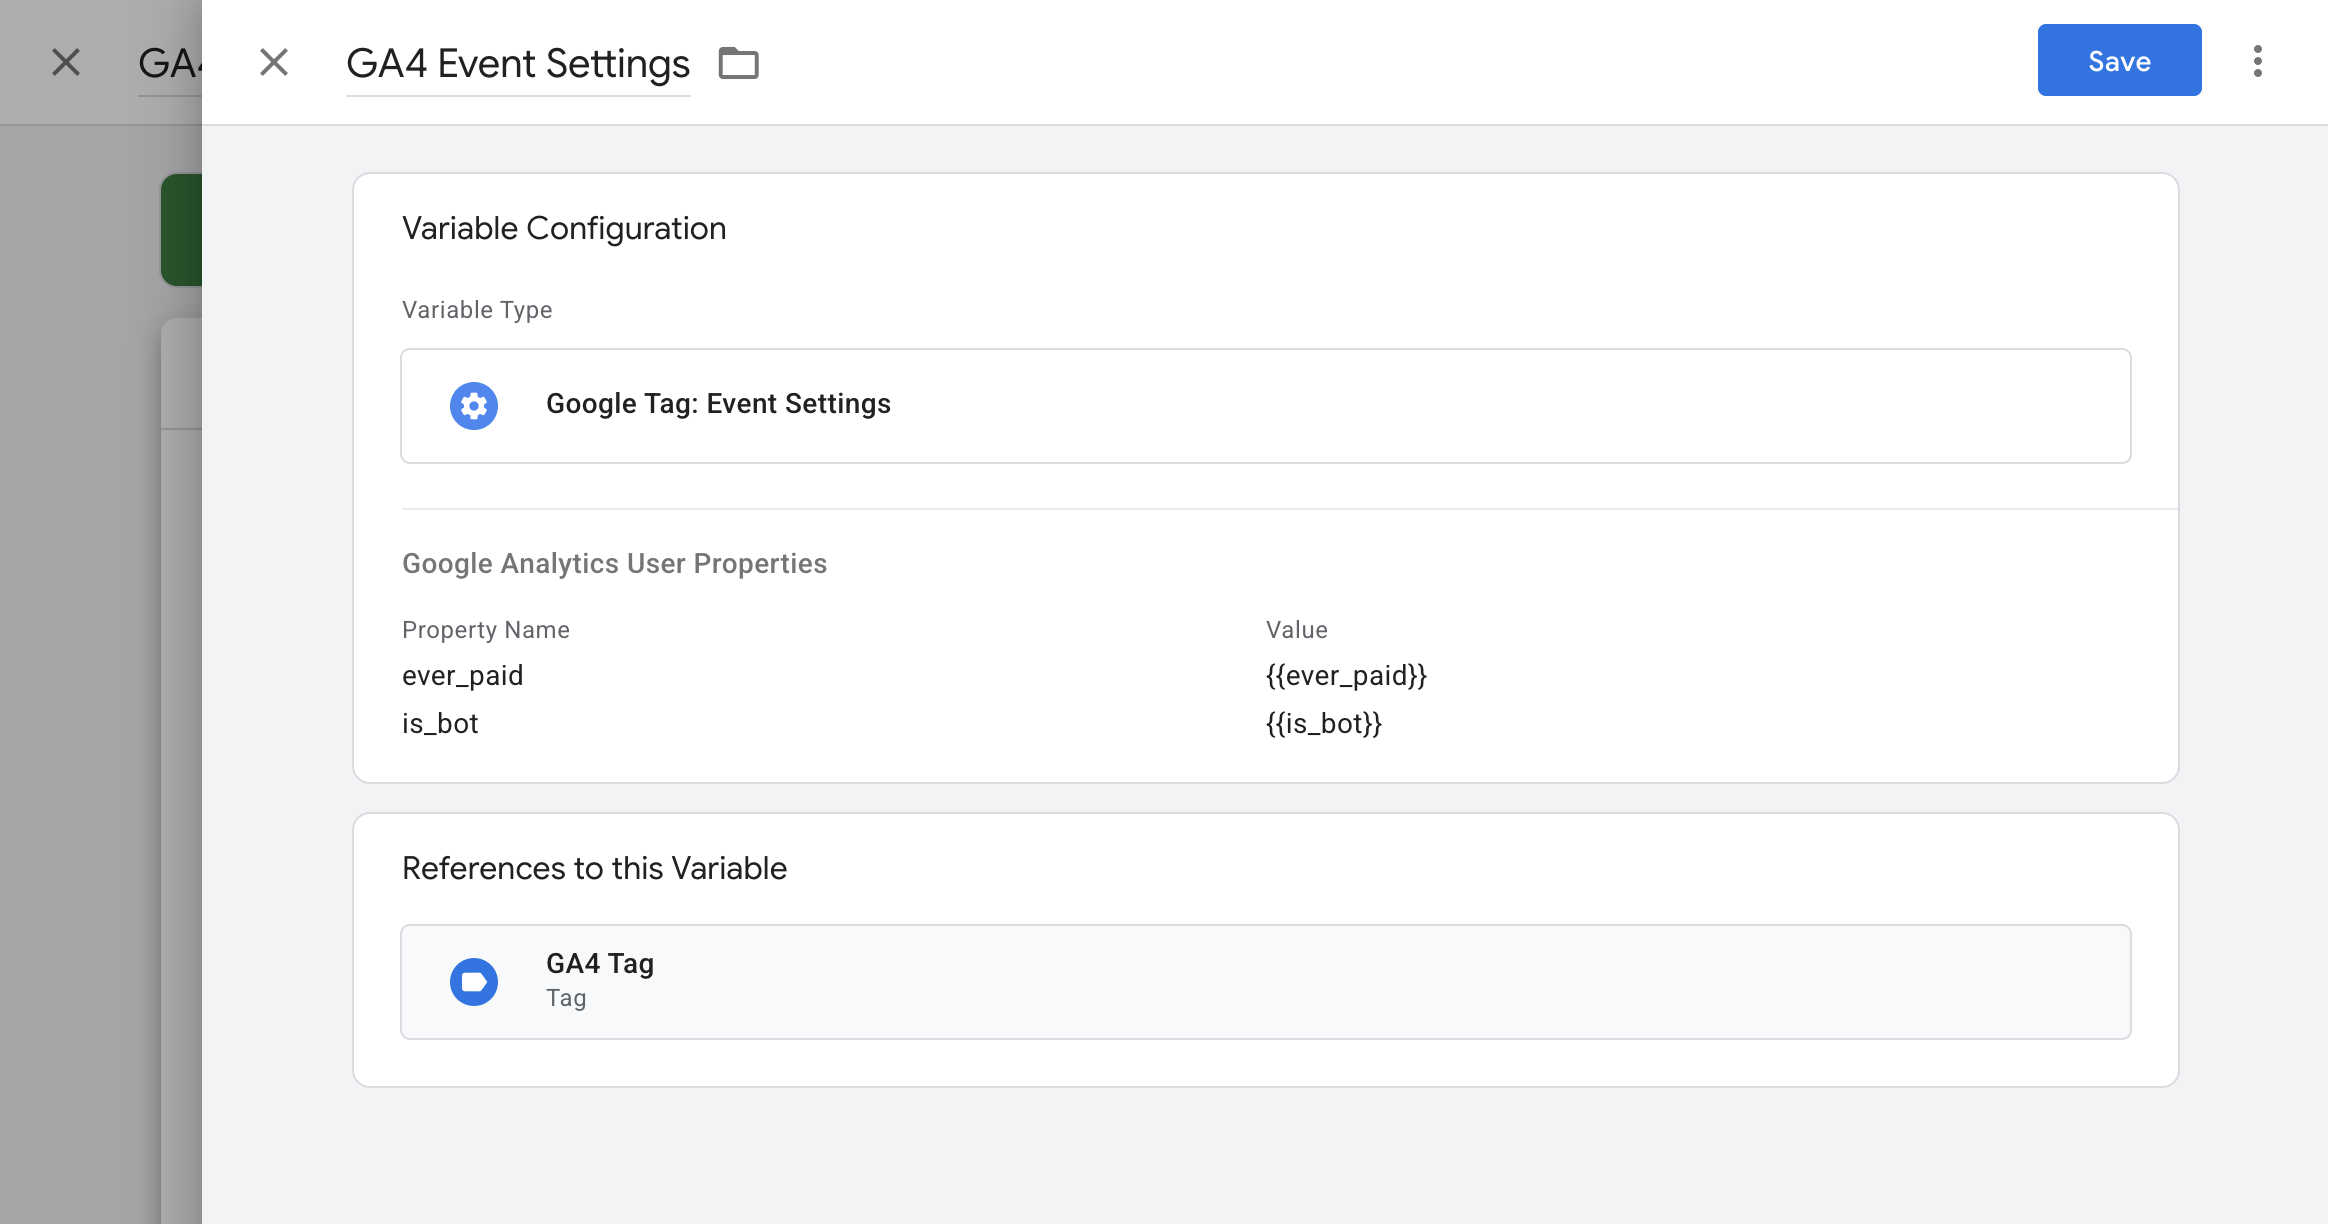
            1. If you don’t already use a Google Tag: Event Settings variable, create one.
              1. Image without caption
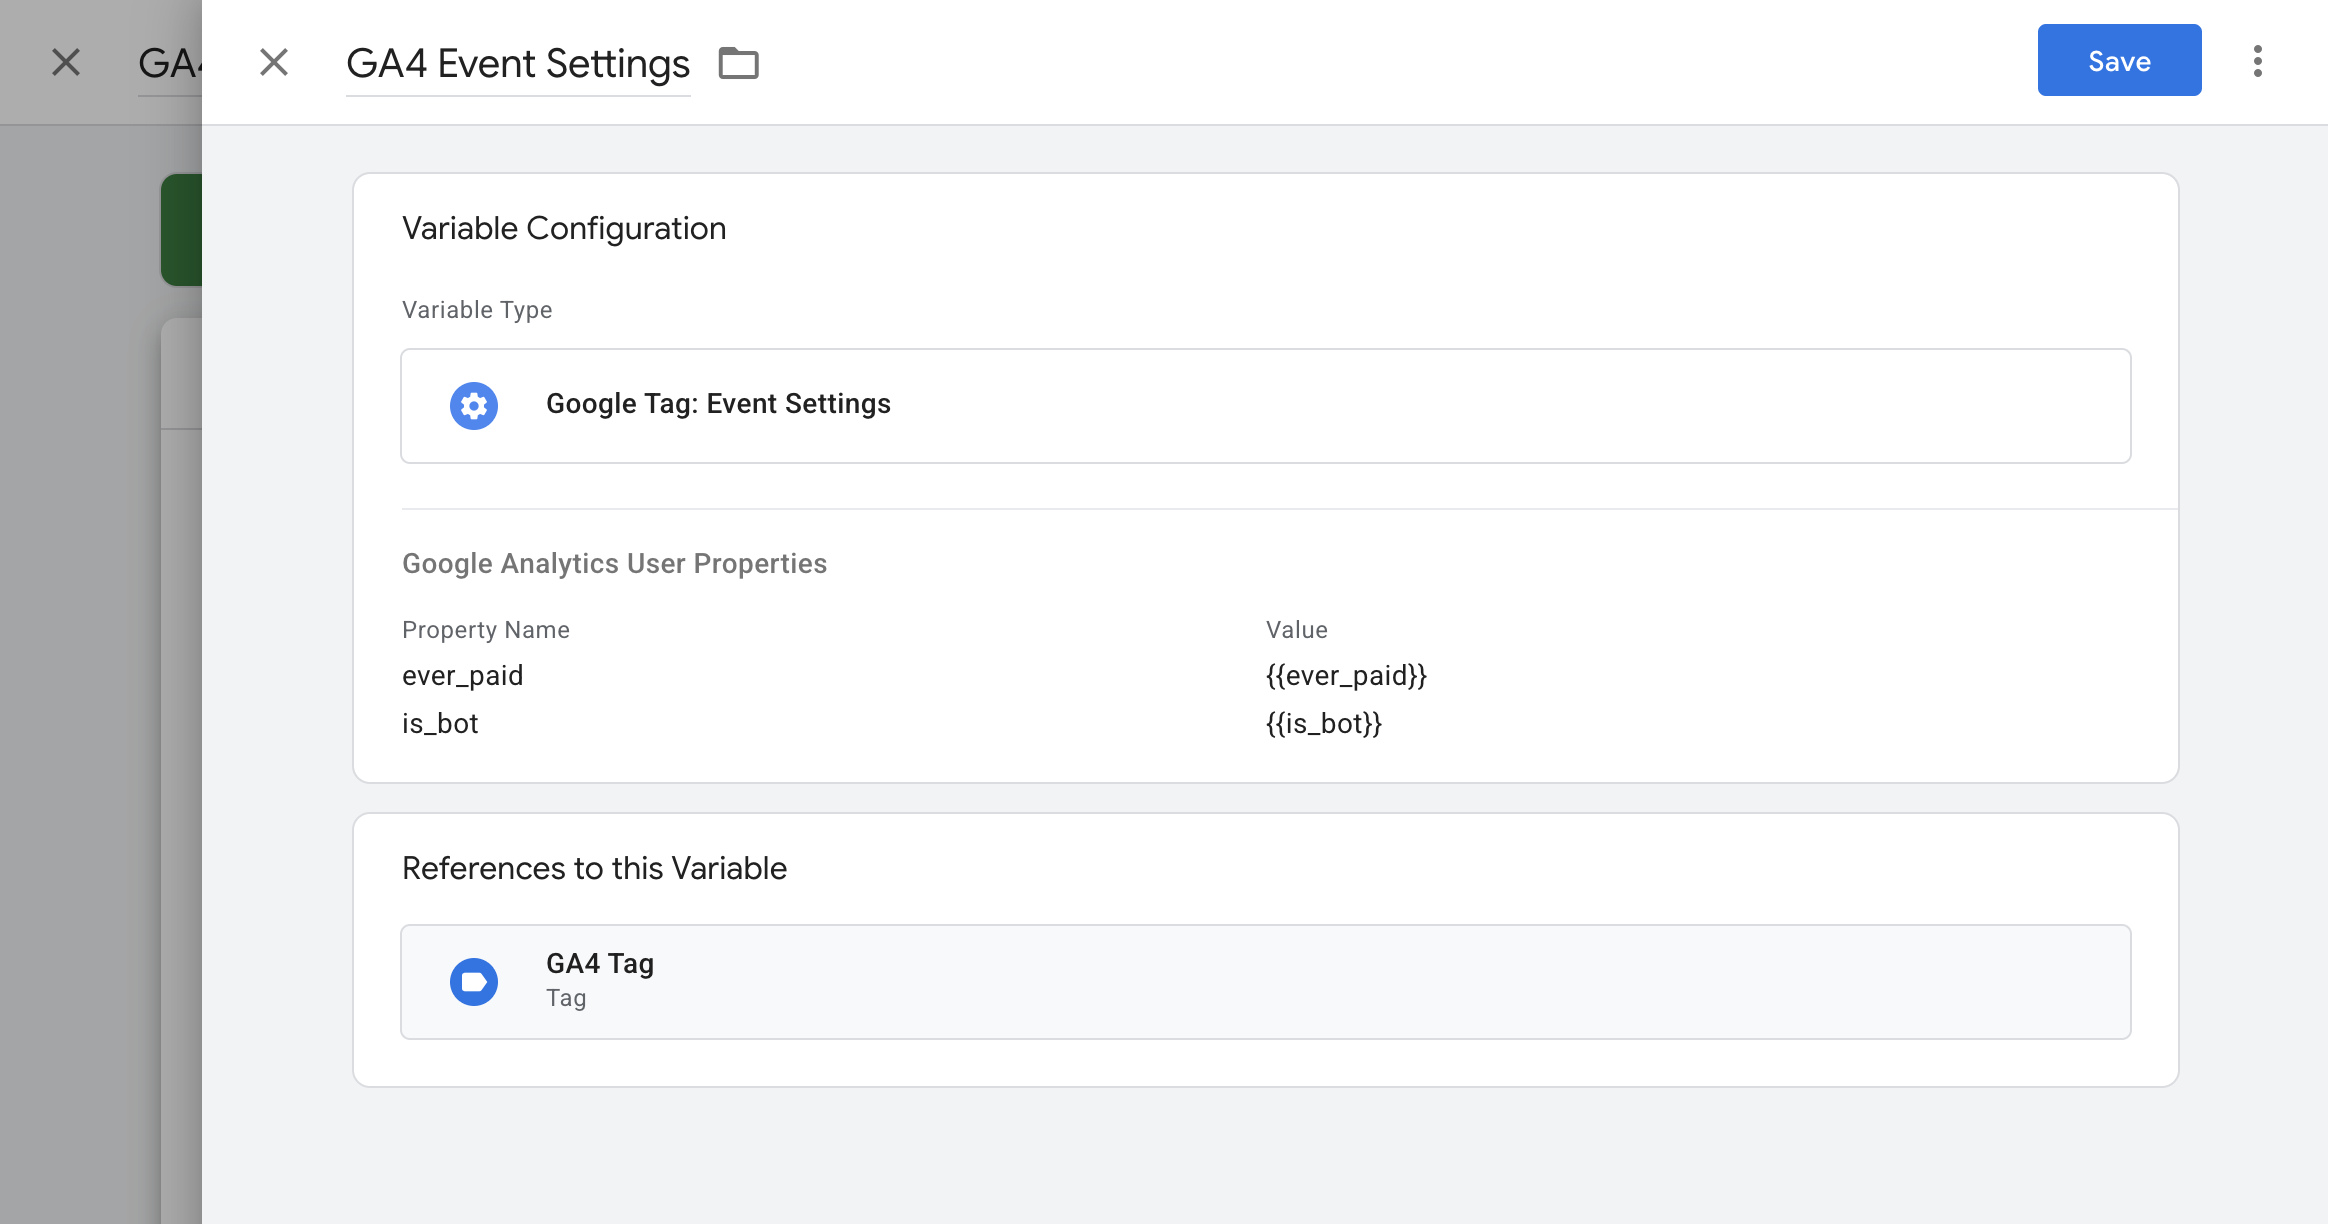
            1. Under the User Properties section of your Google Tag, add a new row with the Parameter and the corresponding Value (the Data Layer variable you created).
            1. Select the created Event Settings Variable in each GA4 configuration and event tag.
              1. Image without caption
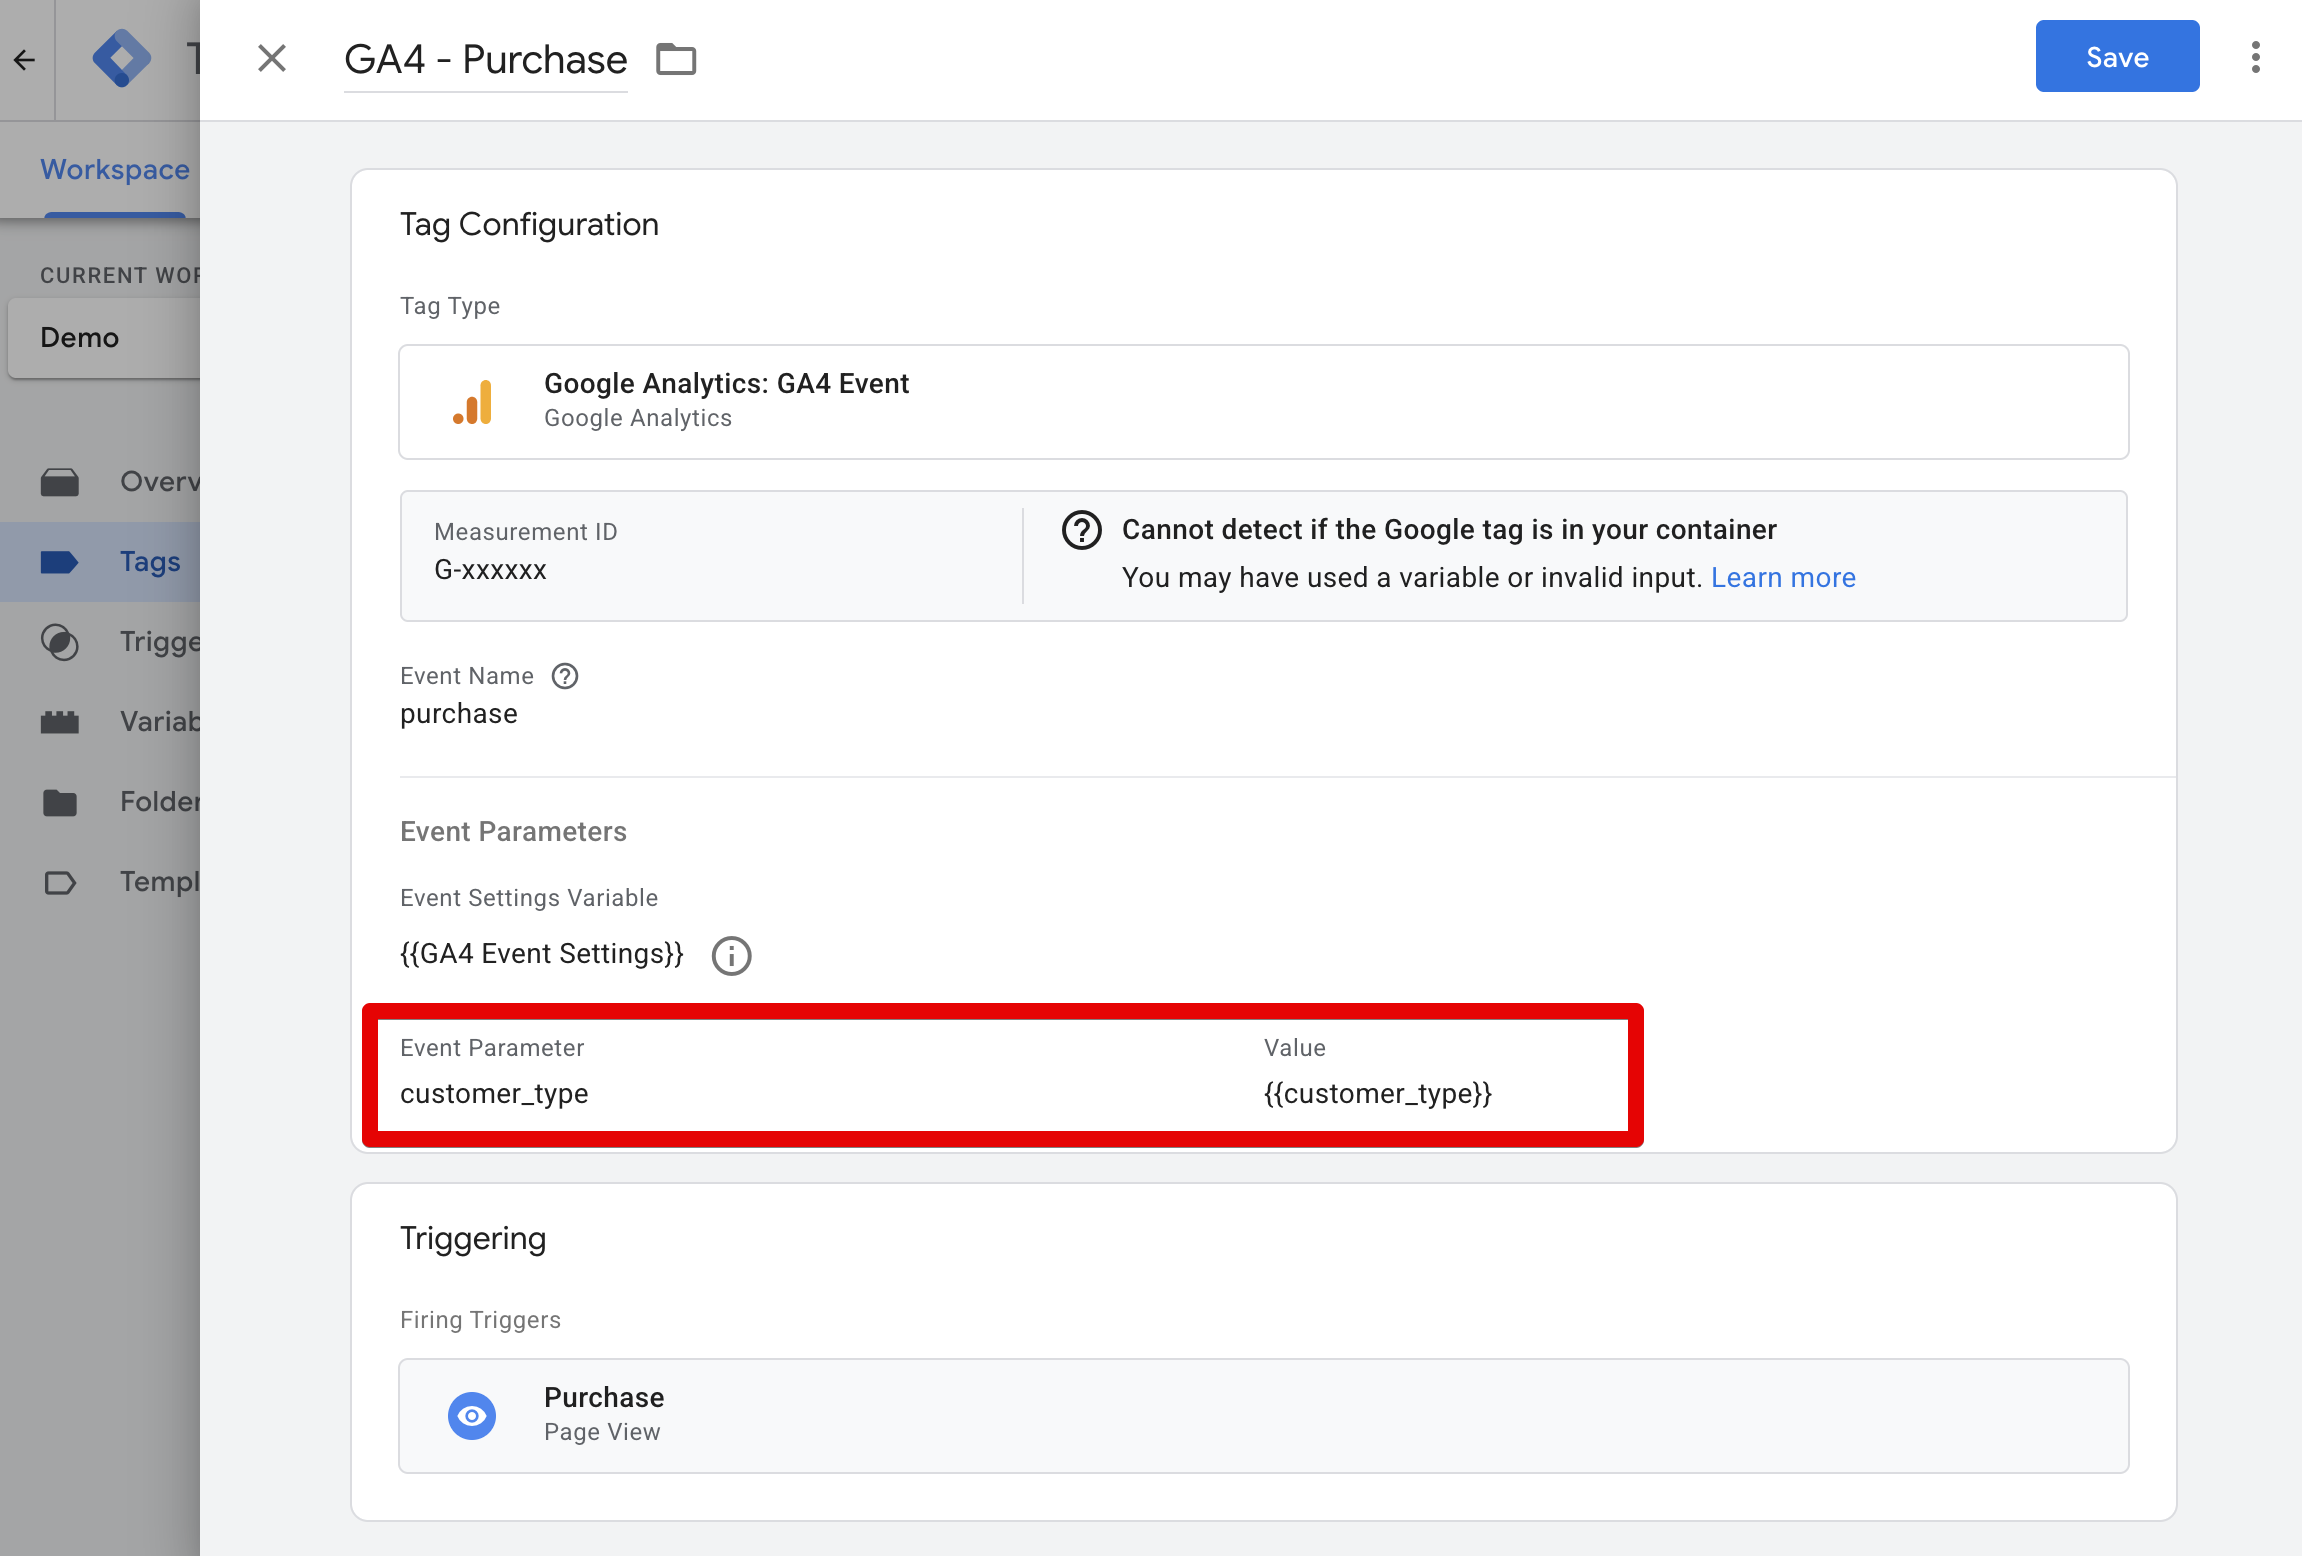
        • Tracking event parameters:
            1. Open your GA4 event tag that tracks conversions.
            1. In the Event Parameter section, add a new row with the Parameter and the corresponding Value (the Data Layer variable you created).
              1. Image without caption
      • For GA4 using gtag.js: Add the parameter to the appropriate command in your measurement code:
        • Tracking user properties:
          • javascript
            gtag('config', '<TAG_ID>', { '<parameter_name>': '<parameter_value>' });
        • Tracking event parameters:
          • javascript
            gtag('event', '<event_name>', { '<parameter_name>': '<parameter_value>' });

Parameters to Implement

  1. Config parameter - User ID (user_id)
    1. Pass a unique user ID after login to track users across sessions on different devices.
      • Example for gtag.js:
      javascript
      gtag('config', 'STREAM_ID', { 'user_id': 'USER_ID' });
  1. User property - IP Address (ip_address)
    1. Collect the user's IP address. Please note that collecting a user's IP address should only be done after obtaining their explicit consent.
      • Example for gtag.js:
      javascript
      gtag('config', 'STREAM_ID', { 'user_properties': { 'ip_address': 'IP_ADDRESS' } });
  1. User property - Ever Paid (ever_paid)
    1. Track whether a user has ever converted with a true or false flag.
      This parameter is necessary freemium subscription based businesses where users can login to the platform on the same website where they can convert, it’s necessary to be able to differentiate all actions of converted customers.
      • Example for gtag.js:
      javascript
      gtag('config', 'STREAM_ID', { 'user_properties': { 'ever_paid': '<true or false>' } });
  1. Event parameter - First-Time Purchase (is_first_purchase)
    1. Indicate whether the event is a first-time or repeat conversion.
      • Example for gtag.js:
      javascript
      gtag('event', '<event_name>', { 'is_first_purchase': '<true or false>' });

Creating user scoped custom dimensions

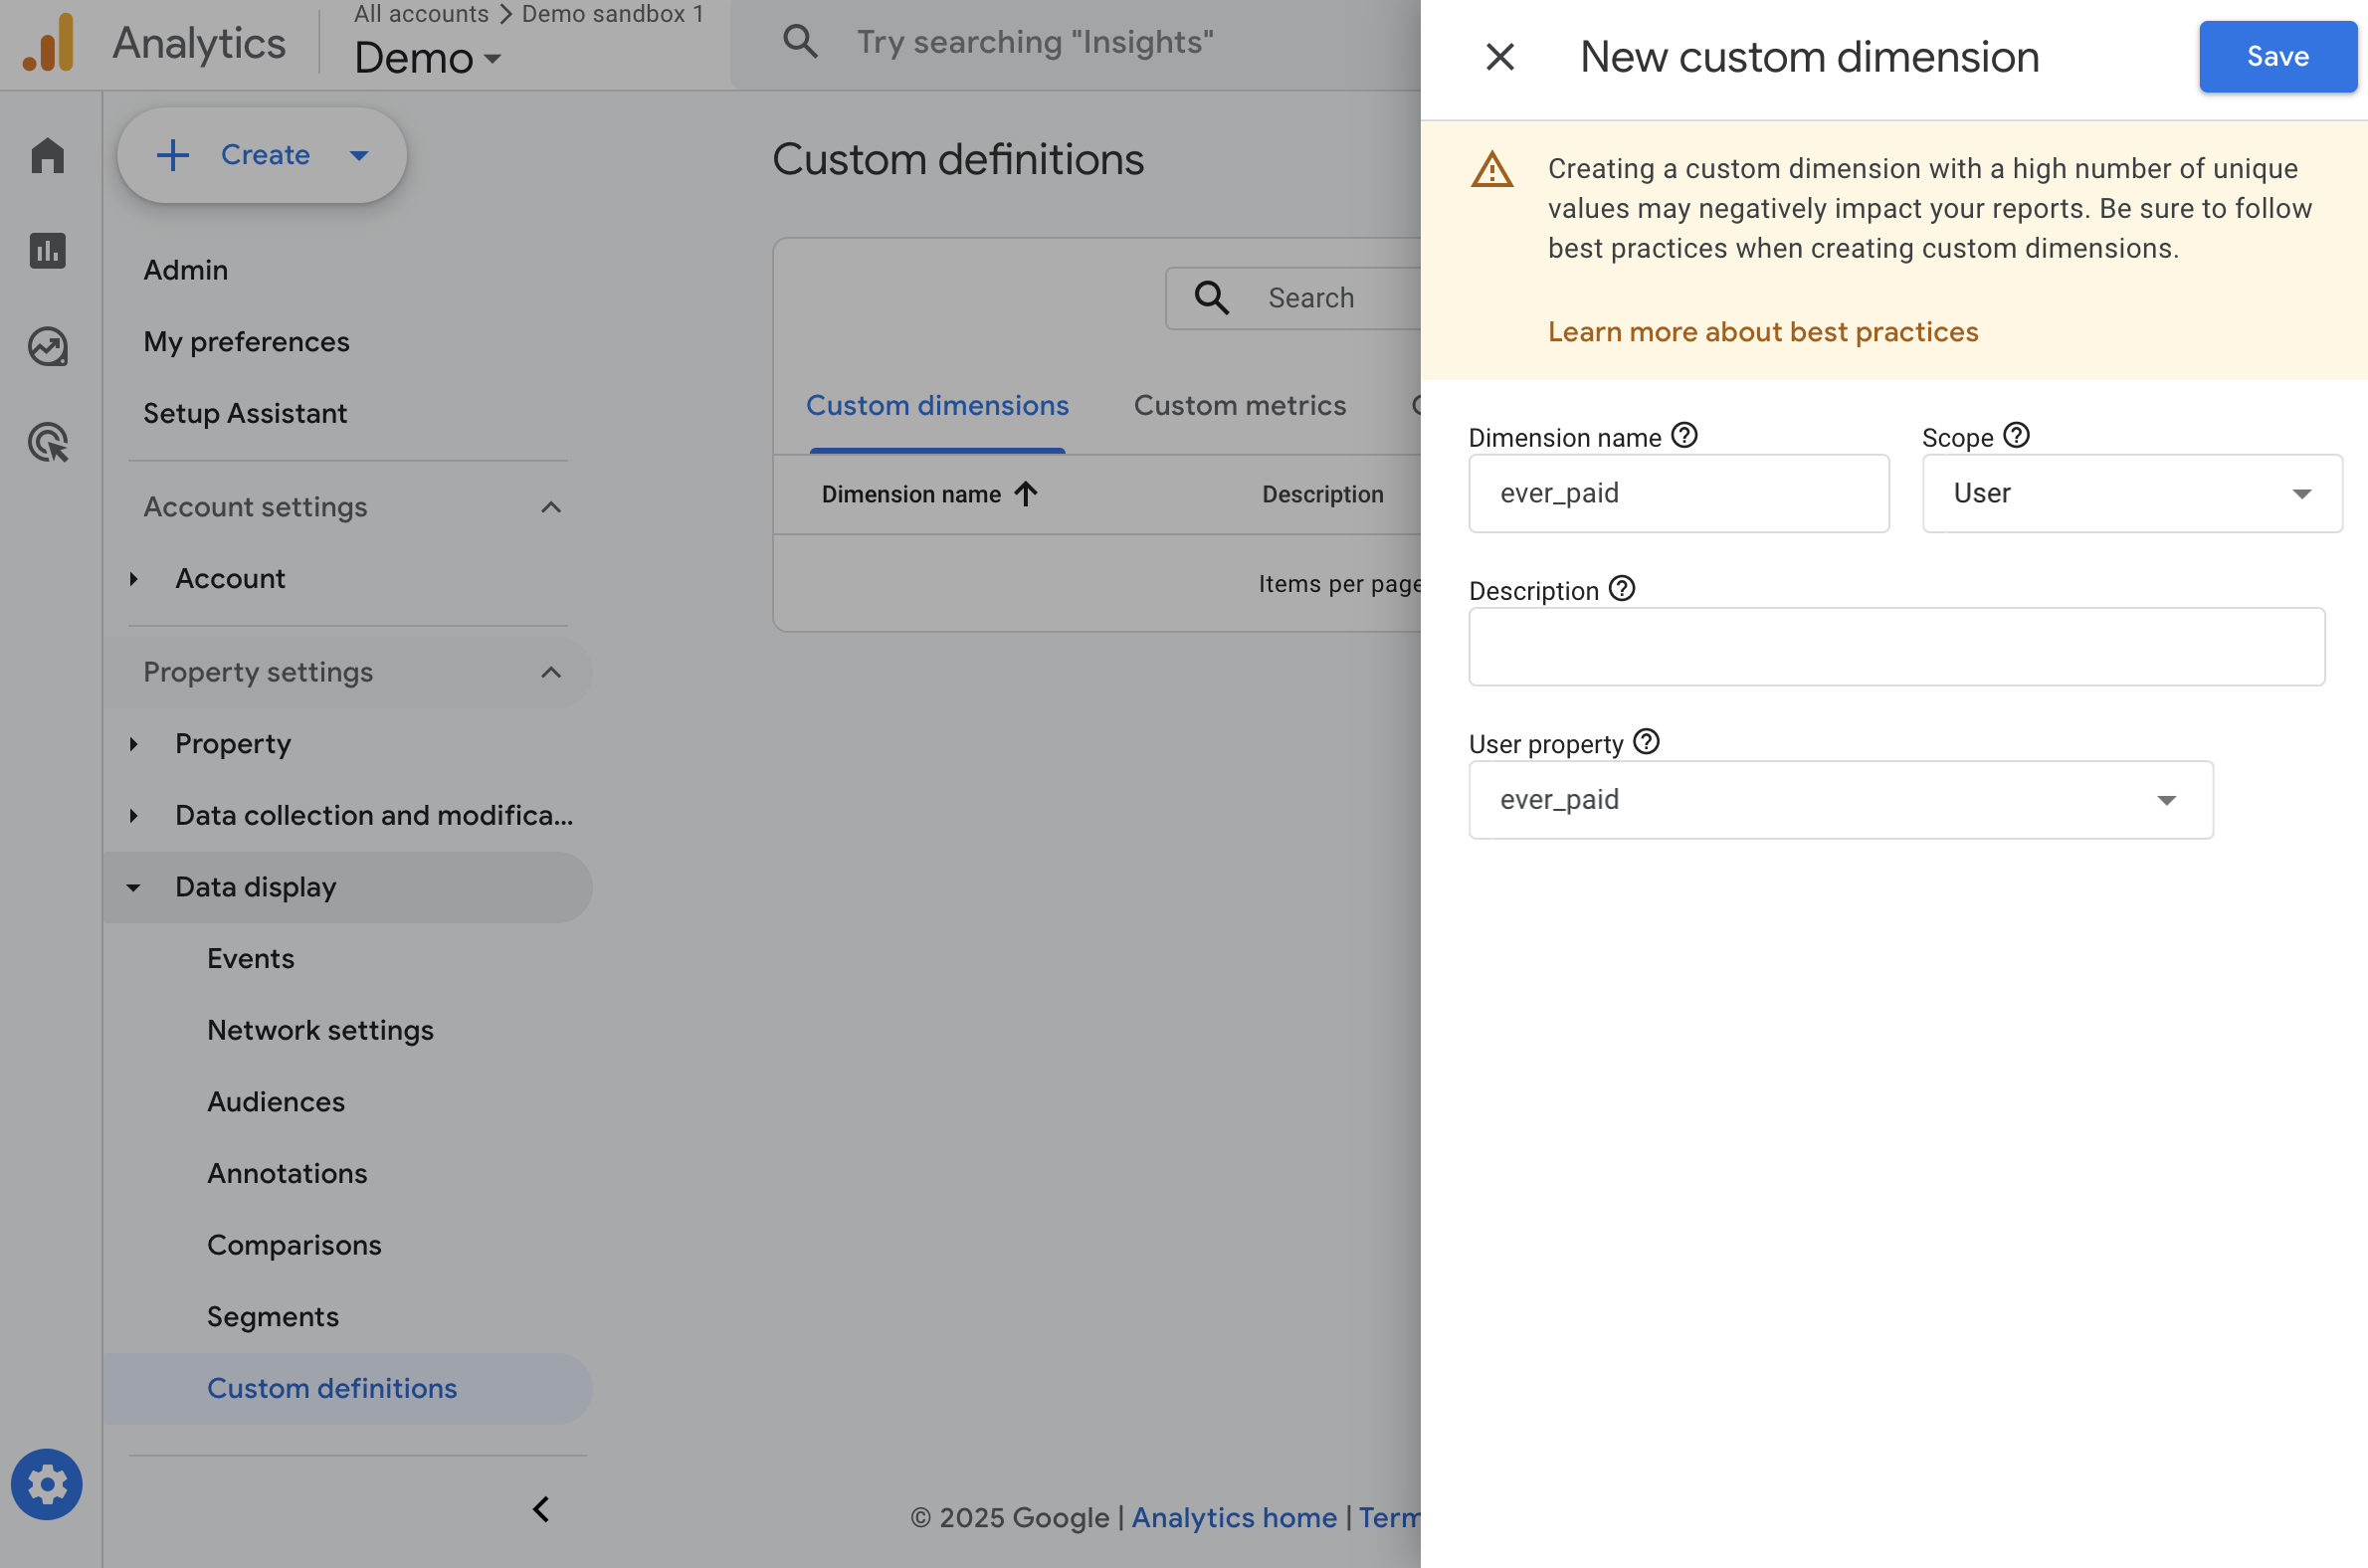
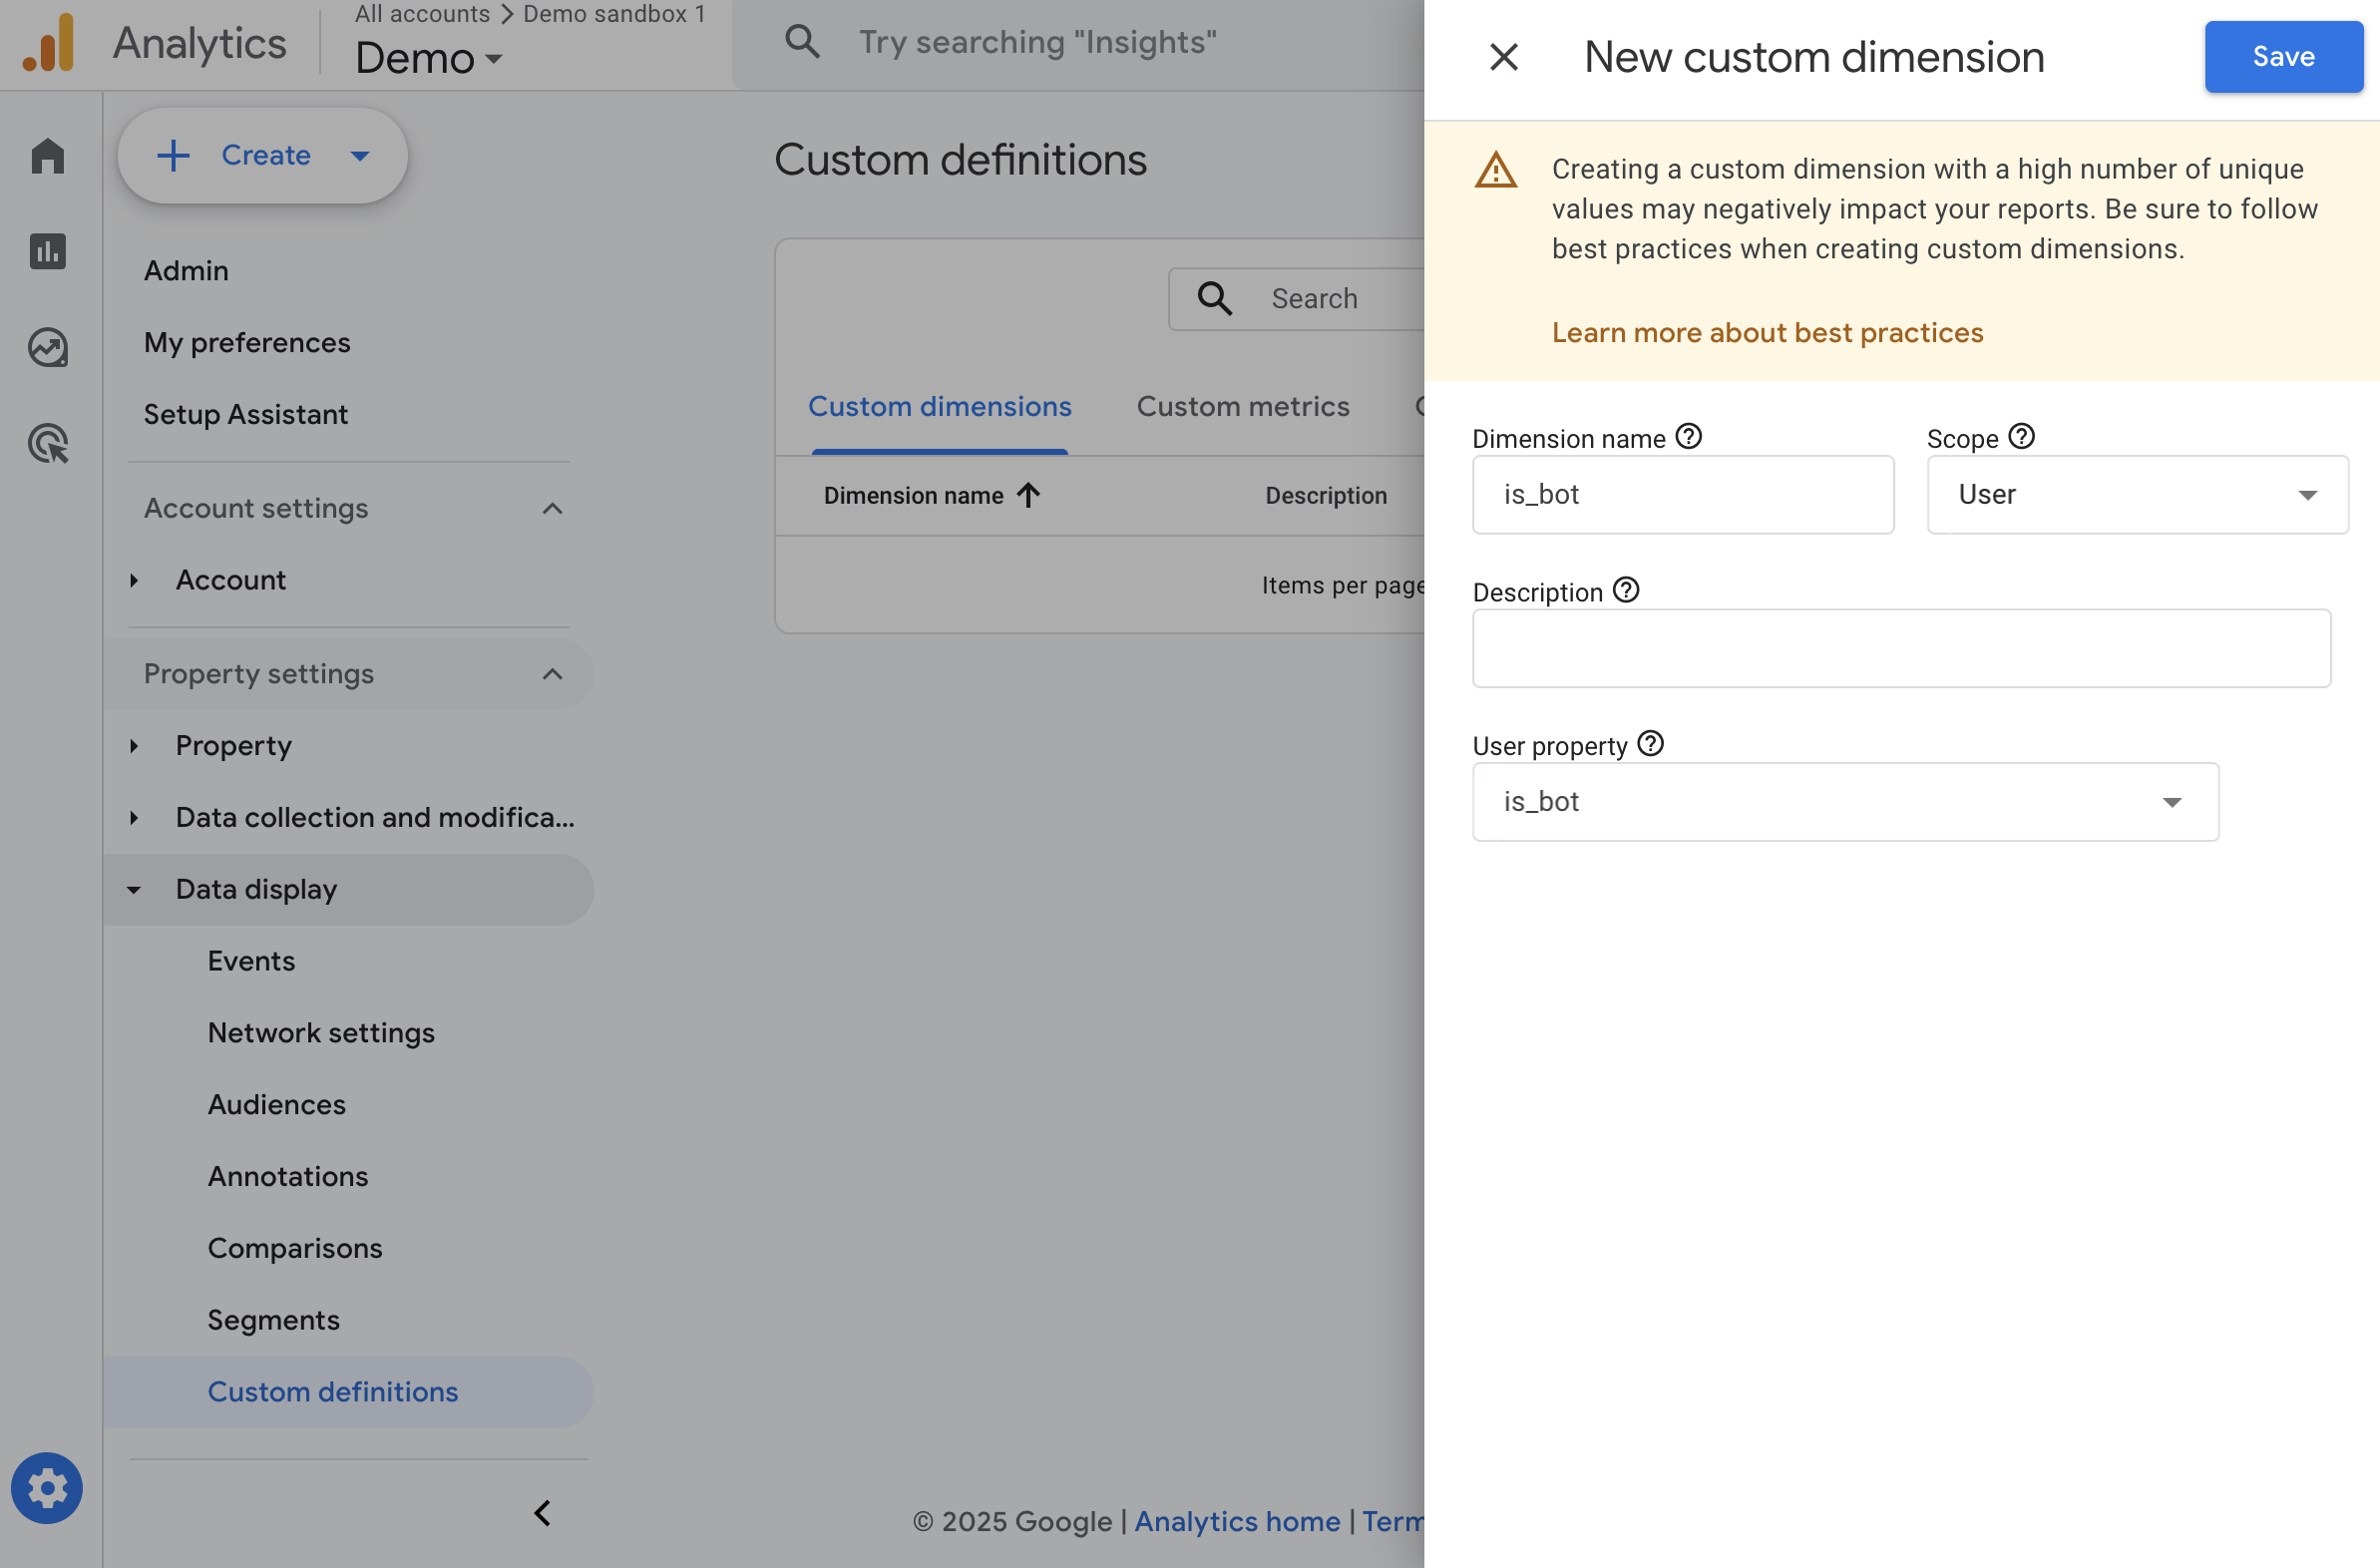
It’s recommended to create user level custom dimensions inside your GA4 admin panel for the user properties ever_paid, ip_address, and isBot.
Follow these steps in your GA4 admin panel:
  1. Go your GA4 property’s Admin settings.
  1. In the Data display section, select Custom definitions.
  1. Click on Create custom dimension.
  1. Set the Scope to User.
  1. Depending on the property you are setting up, use these settings:
      • ip_address:
        • Dimension name: IP Address
        • Description: User’s IP Address
        • User property: ip_address
      • ever_paid:
        • Dimension name: Ever Paid
        • Description: Flag indicating if the user has ever paid
        • User property: ever_paid
      • isBot:
        • Dimension name: Is Bot
        • Description: Flag indicating if the user is a bot
        • User property: isBot
  1. Click Save.
Image without caption

Implementing SegmentStream SDK

The SegmentStream SDK script sends additional GA4 events that act as user engagement signals. It also improves the attribution of users who begin browsing your website through in-app browsers that open when ads are clicked within apps, such as Instagram, LinkedIn, etc.
Below is the guide for implementing the script and the GA4 event.
  1. Inside your Google Tag Manager go to Tags, and click New:
    1. Image without caption
  1. Name the tag SegmentStream SDK, and choose the Custom HTML tag type:
    1. Image without caption
  1. Enter the following code and choose All Pages in the Firing Triggers option:
    1. Image without caption
      html
      <script async src="https://cdn.segmentstream.com/js/segmentstream.min.js"></script>

Tracking non_idle events

  1. Go to Triggers, and click New:
    1. Image without caption
  1. Name the trigger as it suits you, for example Event - nonIdle, and choose the Custom Event trigger type:
    1. Image without caption
  1. Enter nonIdle in the Event name field, which is the name of the event pushed into the dataLayer by the SDK script. It should look like this:
    1. Image without caption
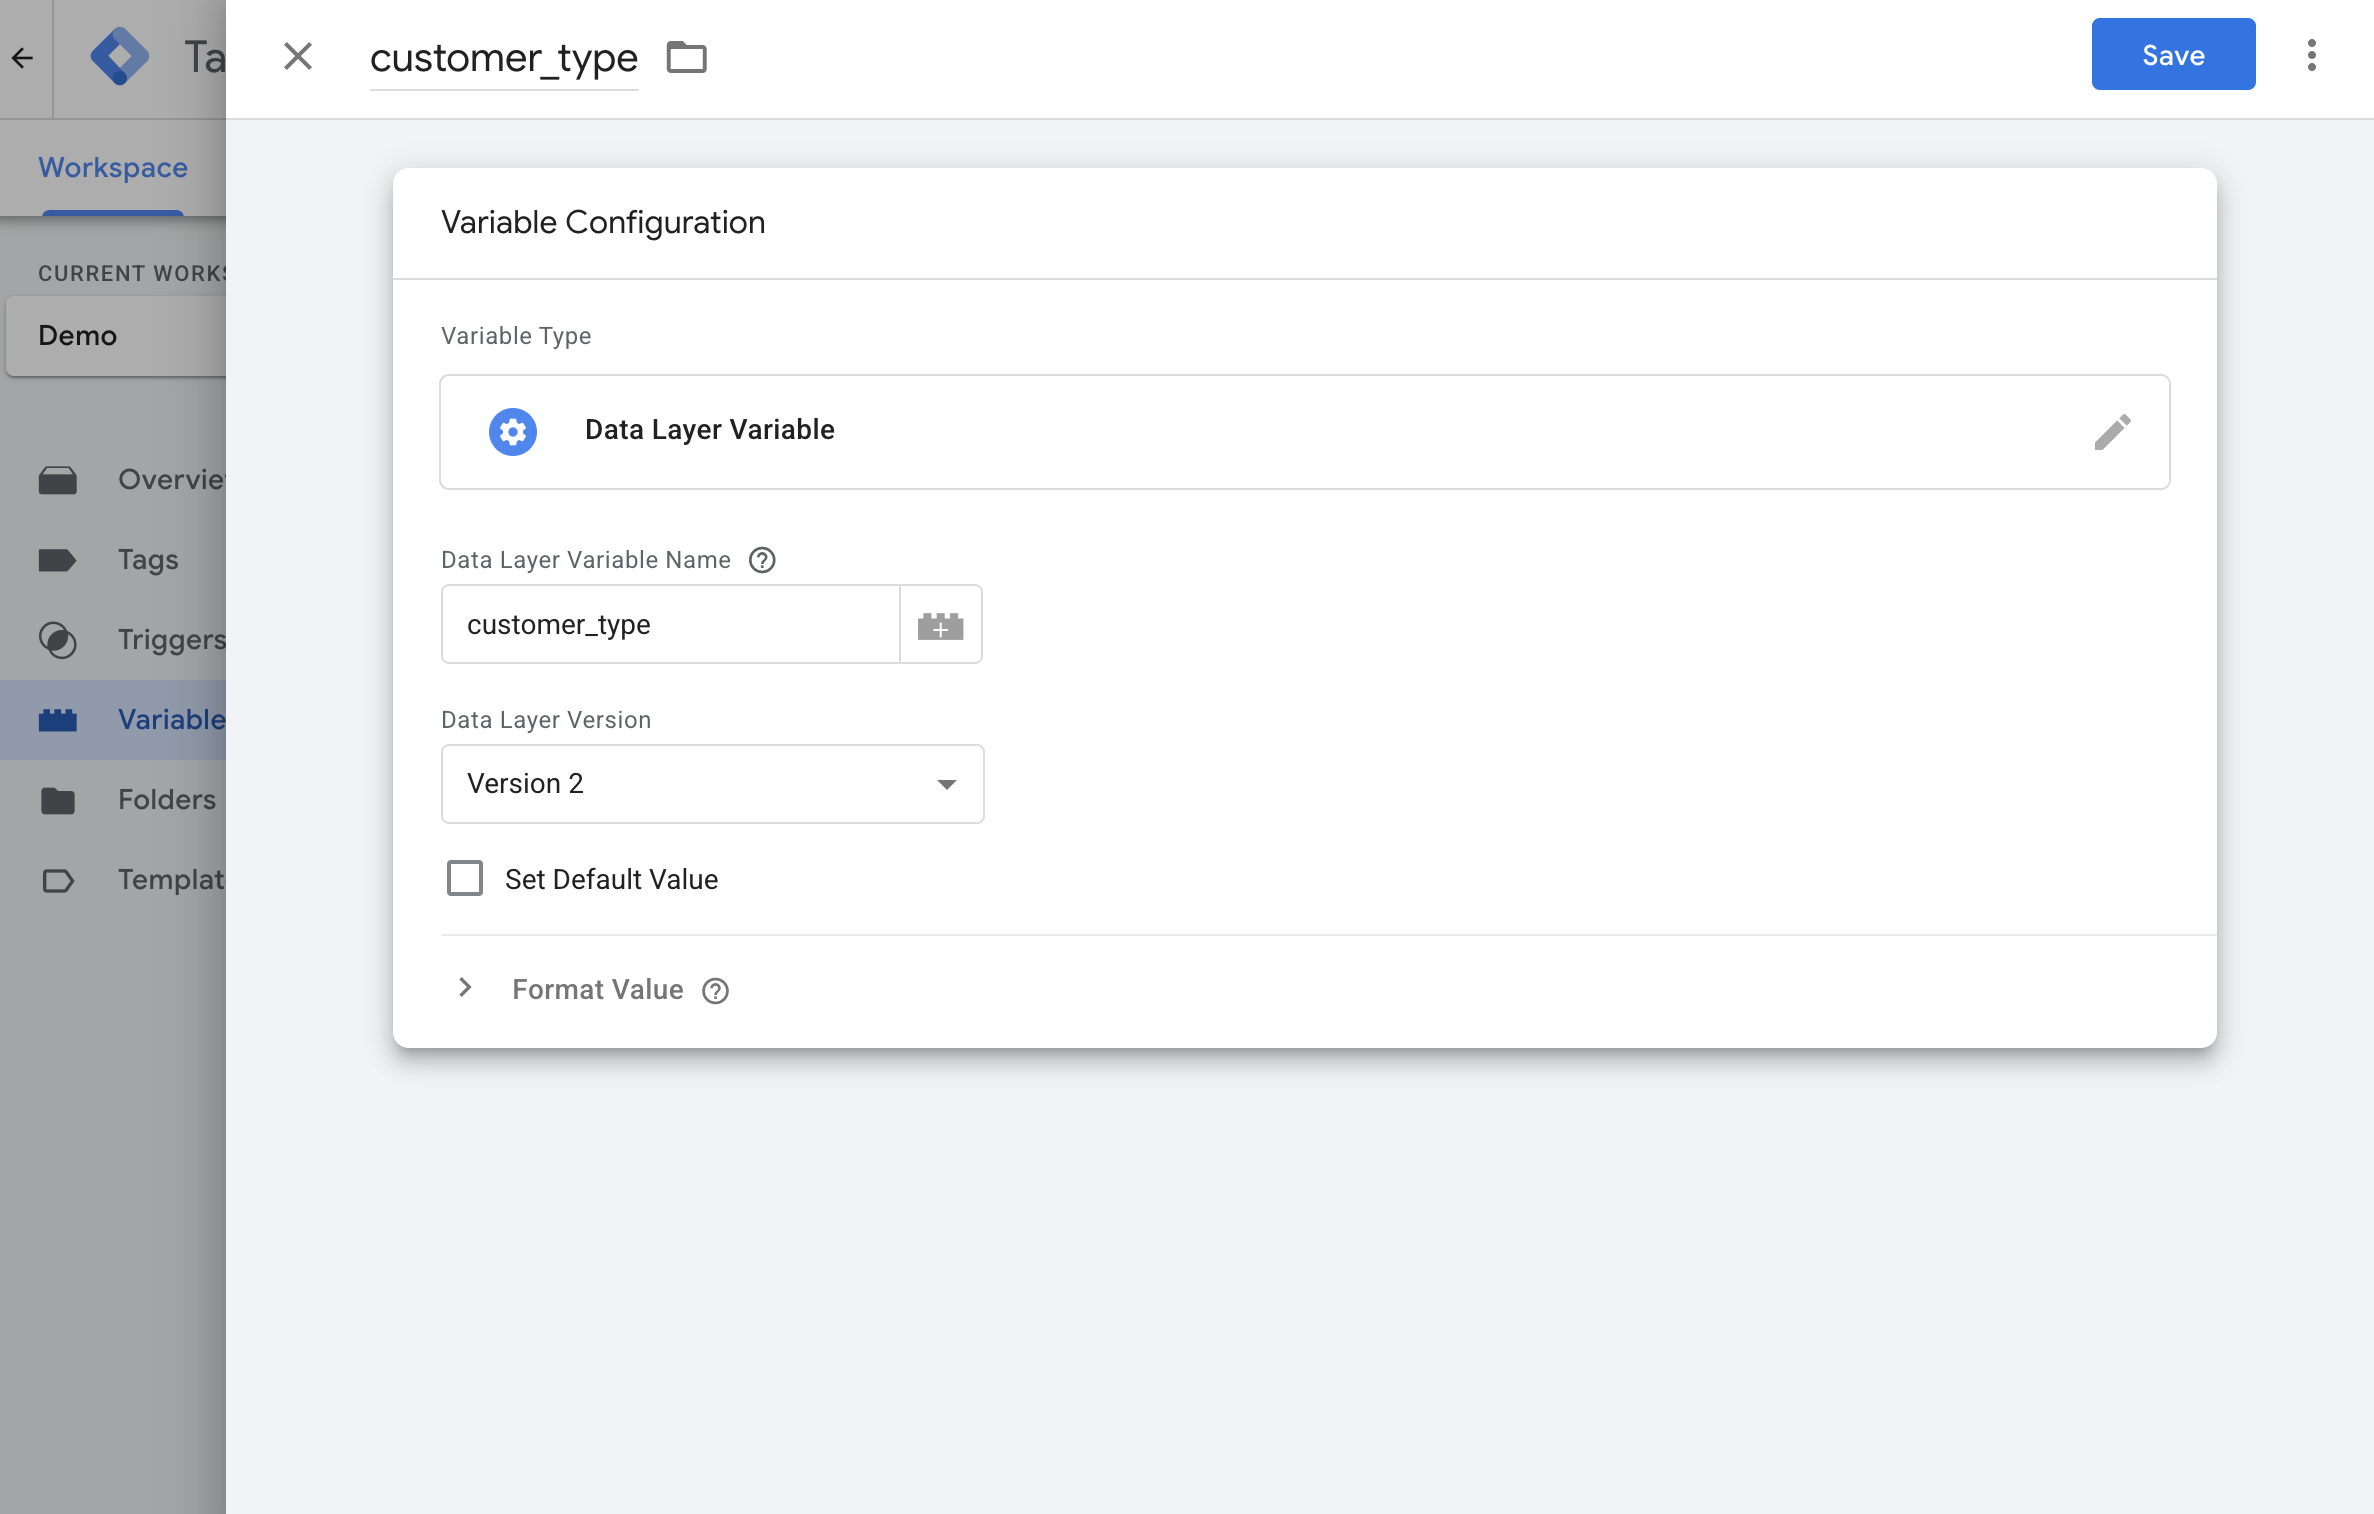
  1. In order to collect the non-idle time, we have to create a new variable. Go to Variables, click New:
    1. Image without caption
  1. Name the variable as nonIdleTimeElapsed, and select the Data Layer Variable type:
    1. Image without caption
  1. Enter nonIdleTimeElapsed in the Data Layer Variable Name field, your variable should look like this:
    1. Image without caption
  1. Go to Tags, click New:
    1. Image without caption
  1. Choose GA4 Event tag type.
    1. Image without caption
  1. Enter the Measurement ID used by your Google Tag.
  1. Set Event - nonIdle as the trigger.
  1. Enter the settings:
      • Event Name: non_idle
      • Event Parameters:
        • value - {{nonIdleTimeElapsed}}
      Image without caption

Detecting Bots

  1. Go to Triggers, and click New:
    1. Image without caption
  1. Name the trigger as it suits you, for example Event - botDetected, and choose the Custom Event trigger type:
    1. Image without caption
  1. Enter botDetected in the Event name field, which is the name of the event pushed into the dataLayer by the SDK script. It should look like this:
    1. Image without caption
  1. Go to Variables, click New:
    1. Image without caption
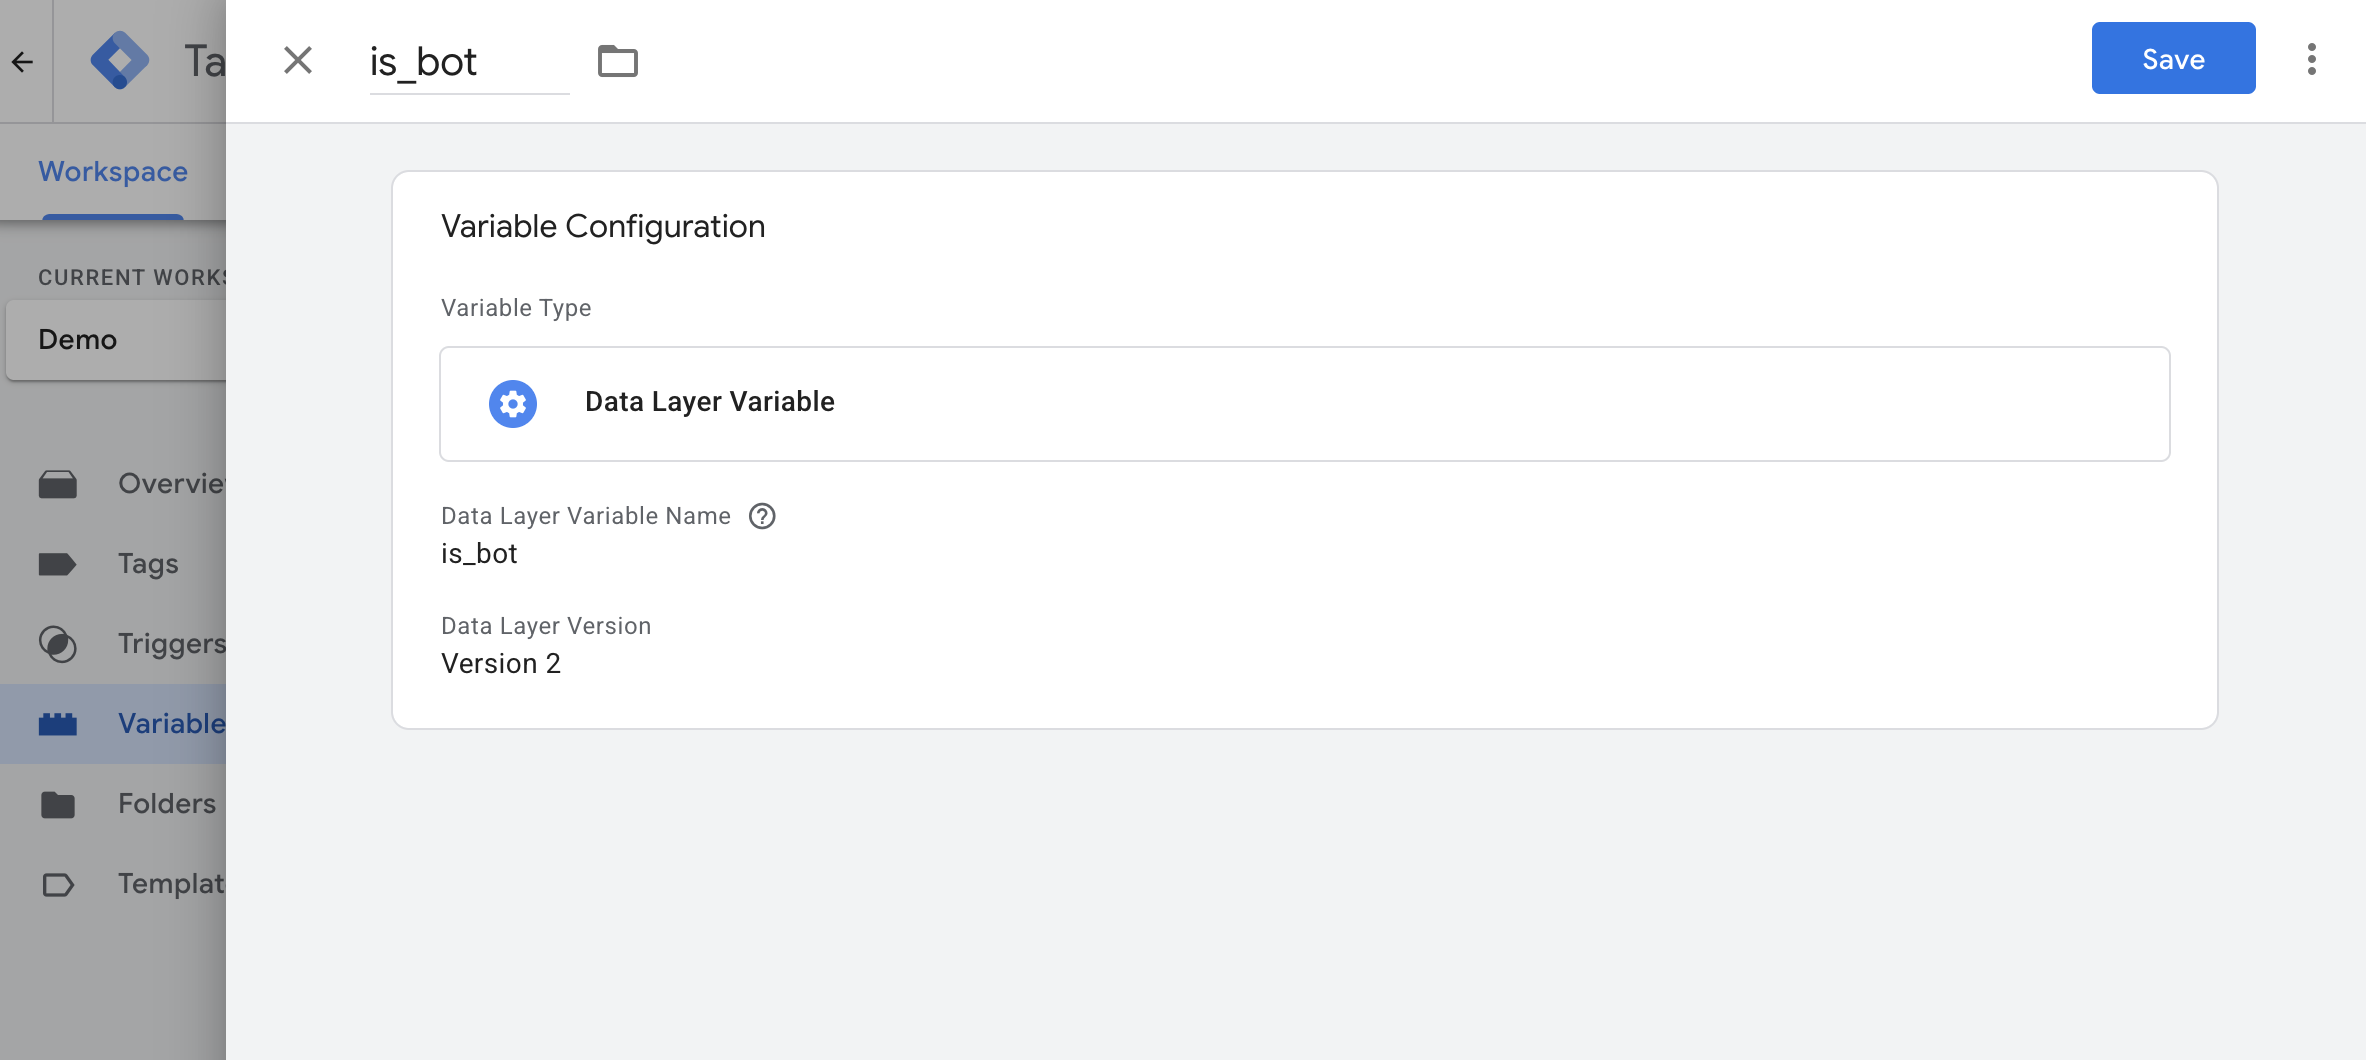
  1. Name the variable as isBot, and select the Data Layer Variable type:
    1. Image without caption
  1. Enter isBot in the Data Layer Variable Name field, your variable should look like this:
    1. Image without caption
  1. Go to Tags, click New:
    1. Image without caption
  1. Choose GA4 Event tag type.
    1. Image without caption
  1. Enter the Measurement ID used by your Google Tag.
  1. Set Event - botDetected as the trigger.
  1. Enter the settings:
      • Event Name: bot_detected
      • User Properties:
        • isBot - {{isBot}}
      Image without caption
  1. Optional - Create an isBot user level dimension by following our guide - Additional GA4 settings.

Configuring SegmentStream SDK Settings

By default, the SegmentStream SDK loads all available modules on your website. If you want to prevent specific modules from loading, you need to configure the settings script before initialising the SDK script.
This configuration is only necessary if you want to disable specific modules. Without it, all modules will be loaded automatically.
Suppose you want to:
  • Enable the collect_activity module (used for sending the non_idle event).
  • Disable the click_id_propagation module (used for attributing users browsing via in-app browsers).
  • Disable the enable_bot_detection module (used for identifying bots).
In this case, use the following script:
html
<script> window.segmentstream_sdk_settings = { collect_activity: true, // Enable activity event tracking click_id_propagation: false, // Disable attribution improvement enable_bot_detection: false // Disable bot detection }; </script> <script async src="https://cdn.segmentstream.com/js/segmentstream.min.js"> </script>