> ## Documentation Index
> Fetch the complete documentation index at: https://docs.segmentstream.com/llms.txt
> Use this file to discover all available pages before exploring further.
# SegmentStream AI Prerequisites
> Prepare your Google Cloud project and GA4 BigQuery export so you are ready to connect to SegmentStream AI when access is granted.
This guide describes the steps you need to complete **before** you can connect to SegmentStream AI. By following these steps now, you will be ready to get started as soon as access is granted to you.
## Overview
To use SegmentStream AI, you need:
1. A Google Cloud project with BigQuery enabled and billing set up.
2. A GA4 BigQuery export configured to send event data to your BigQuery project.
## Step 1. Prepare your Google Cloud project
Follow the steps below to make sure your Google Cloud project is ready.
### 1.1 Create a Google Cloud Platform account
BigQuery is a part of Google Cloud Platform. To use BigQuery you need to have a Google Cloud Platform account.
Go to the [Google Cloud Platform page](https://cloud.google.com/) and click **Get started for free**.
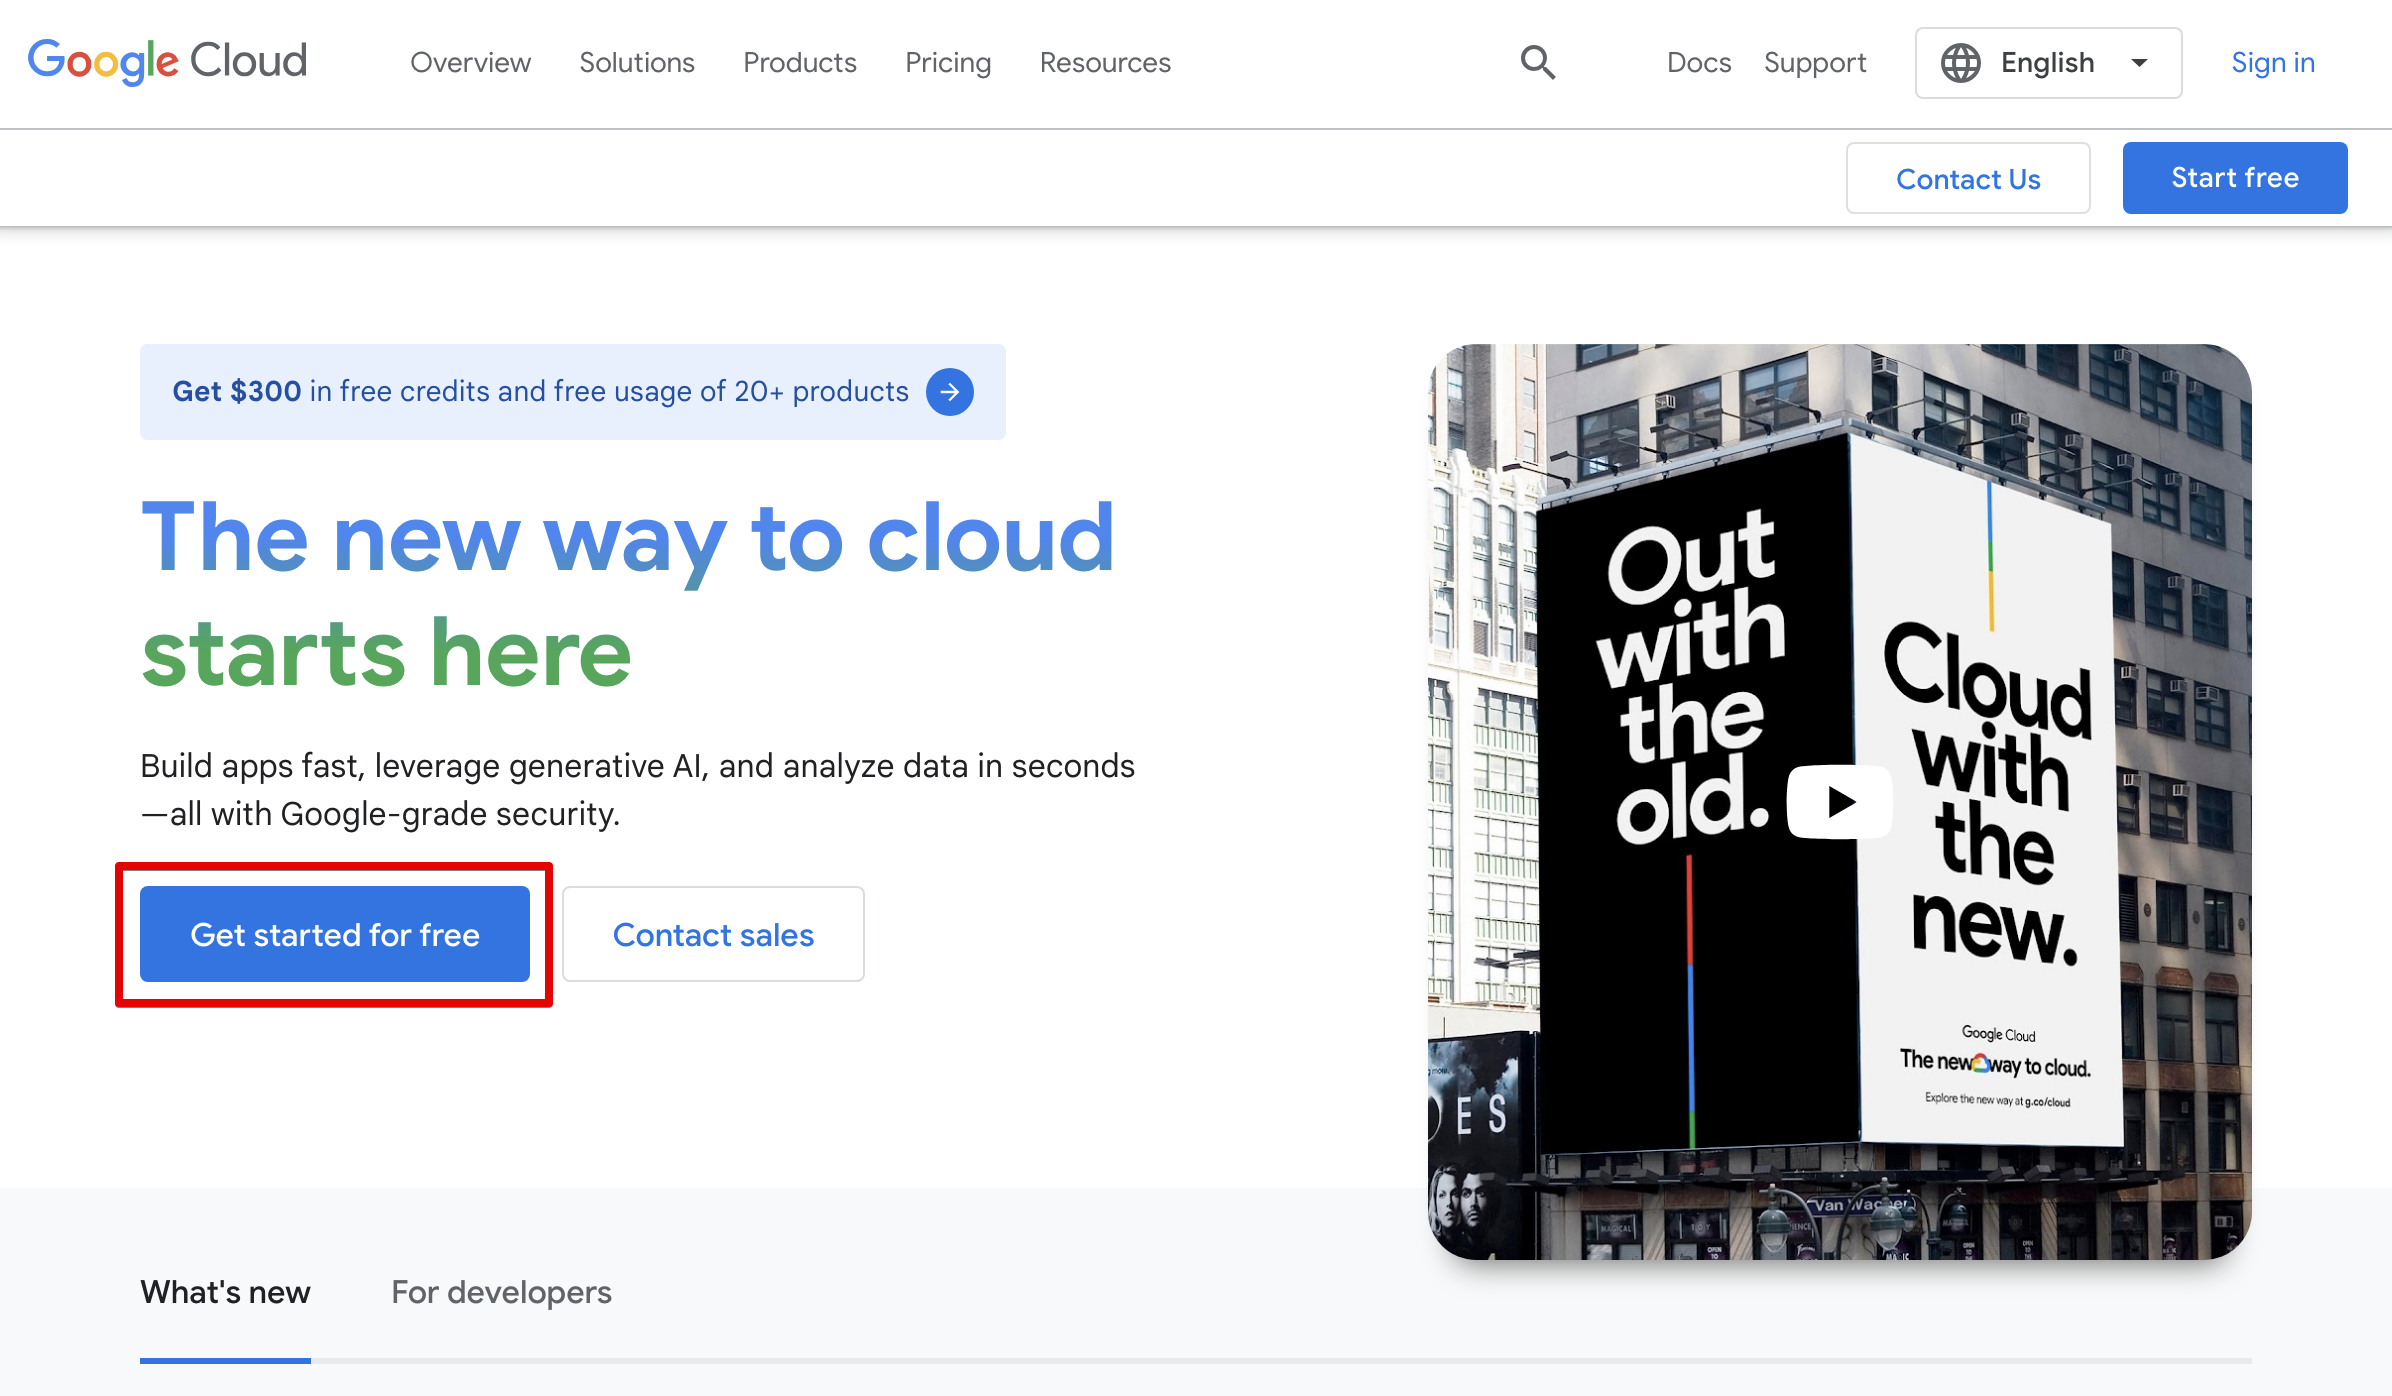 Log in to your Google Account.
Fill in the registration form. Provide valid payment details — it's important, as you need an account with an active payment method to use BigQuery.
### 1.2 Set up a billing account
To use BigQuery you need an active billing account so that you'll be able to use Google Cloud Platform resources.
Free Tier Google Cloud accounts don't support some BigQuery services which are required.
#### Upgrading a Free Tier account
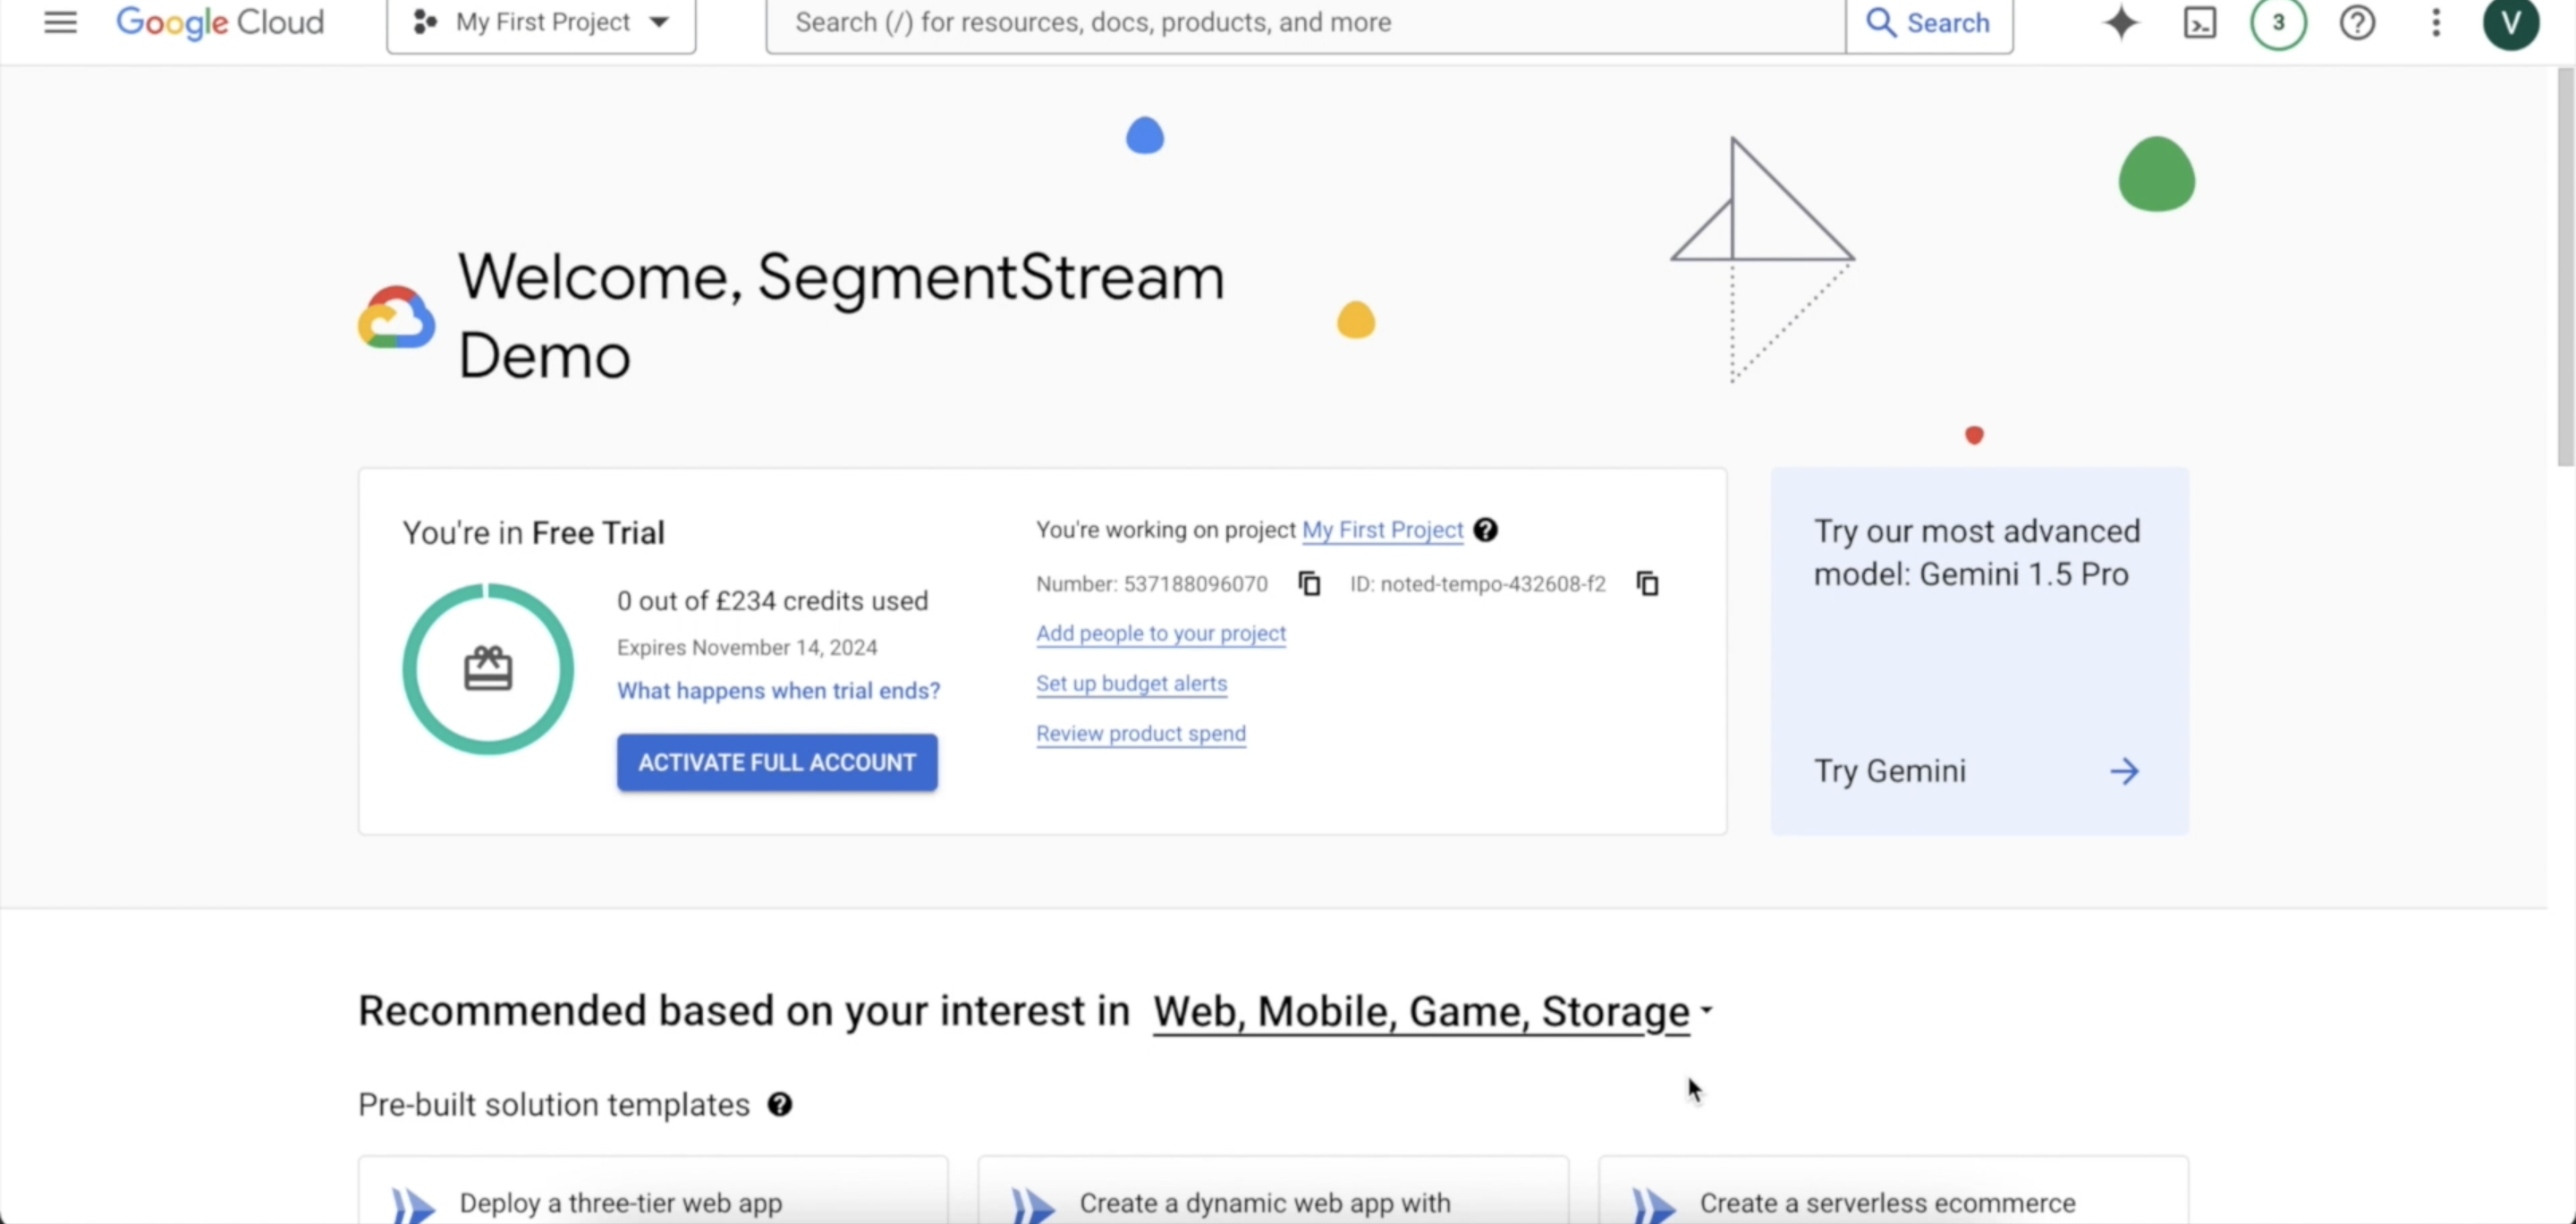
Go to the [main page of your Google Cloud Platform](https://console.cloud.google.com/) project and click **ACTIVATE FULL ACCOUNT**.
Log in to your Google Account.
Fill in the registration form. Provide valid payment details — it's important, as you need an account with an active payment method to use BigQuery.
### 1.2 Set up a billing account
To use BigQuery you need an active billing account so that you'll be able to use Google Cloud Platform resources.
Free Tier Google Cloud accounts don't support some BigQuery services which are required.
#### Upgrading a Free Tier account
Go to the [main page of your Google Cloud Platform](https://console.cloud.google.com/) project and click **ACTIVATE FULL ACCOUNT**.
 More information on upgrading your account can be found [here](https://cloud.google.com/free/docs/gcp-free-tier#how-to-upgrade).
#### Checking billing account status
If you don't have an **ACTIVATE FULL ACCOUNT** button on the main project page, check that you have an active billing account with a valid payment method:
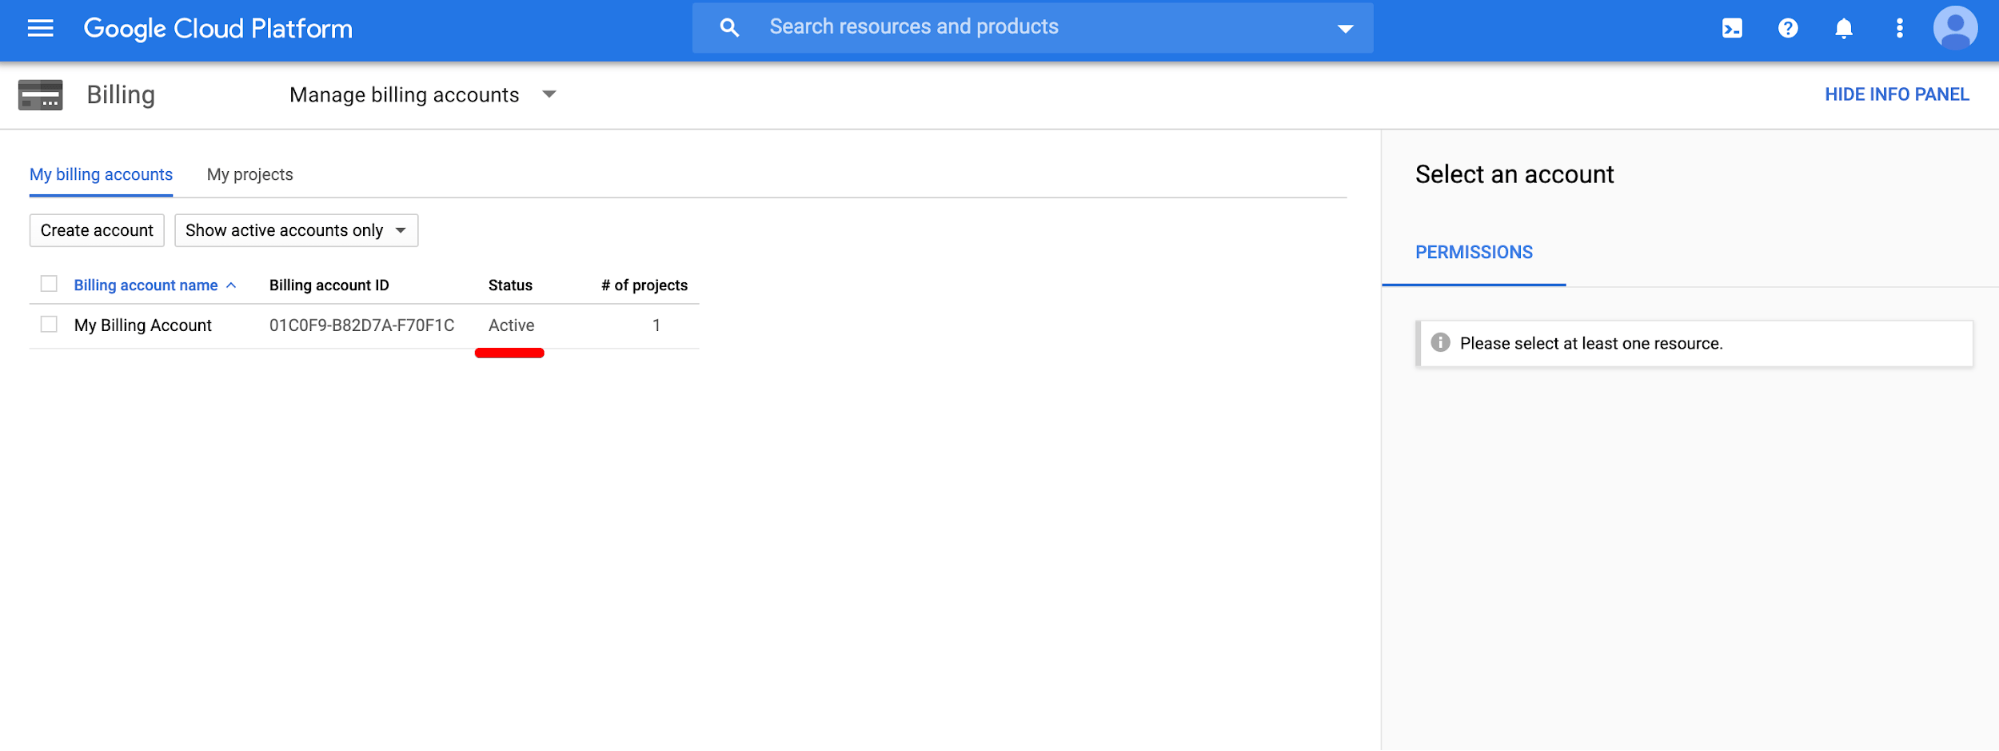
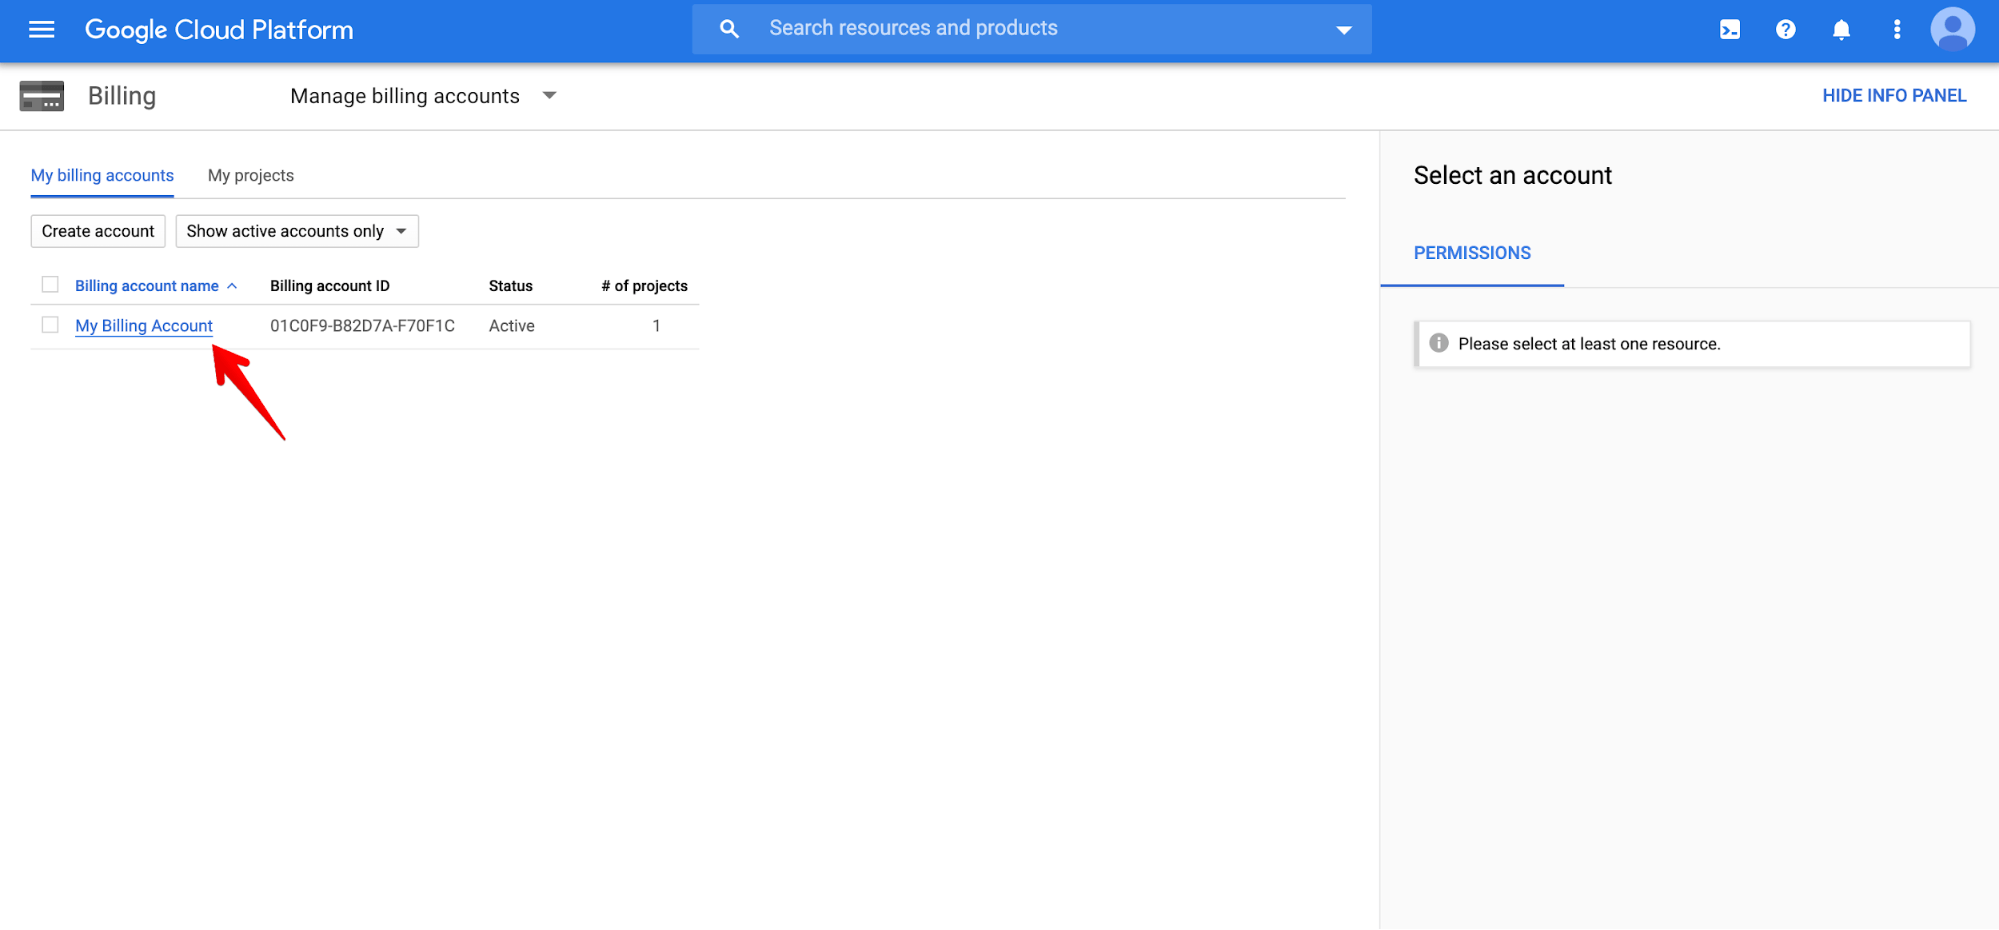
Go to the [Google Cloud Platform Billing page](https://console.cloud.google.com/billing).
Check that you have at least one billing account with active status.
More information on upgrading your account can be found [here](https://cloud.google.com/free/docs/gcp-free-tier#how-to-upgrade).
#### Checking billing account status
If you don't have an **ACTIVATE FULL ACCOUNT** button on the main project page, check that you have an active billing account with a valid payment method:
Go to the [Google Cloud Platform Billing page](https://console.cloud.google.com/billing).
Check that you have at least one billing account with active status.
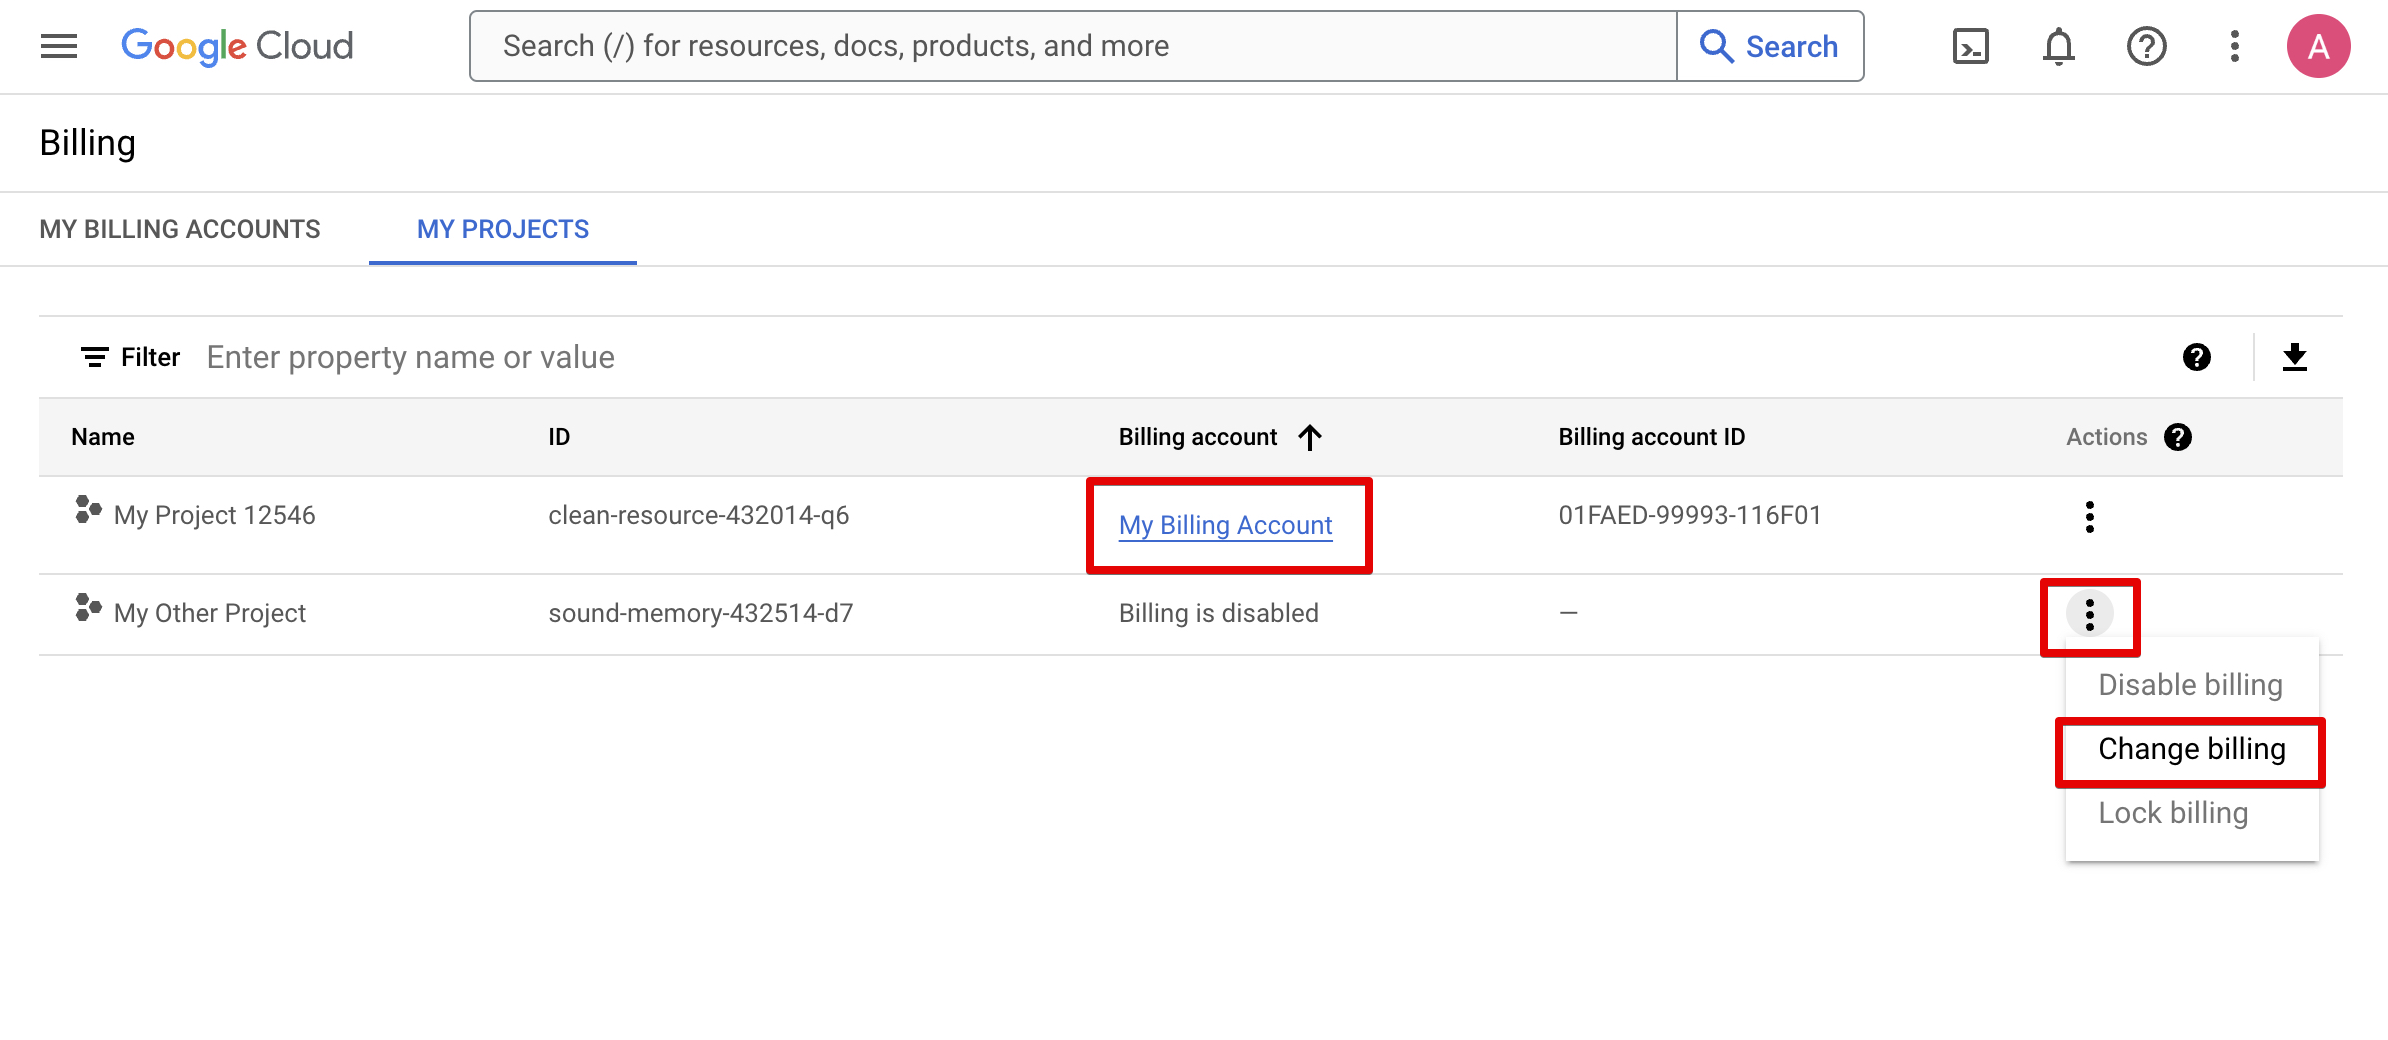
 Click on **MY PROJECTS**, and confirm that the billing account is linked to your project. If it isn't linked, click the "more icon" then **Change billing** to link an active billing account.
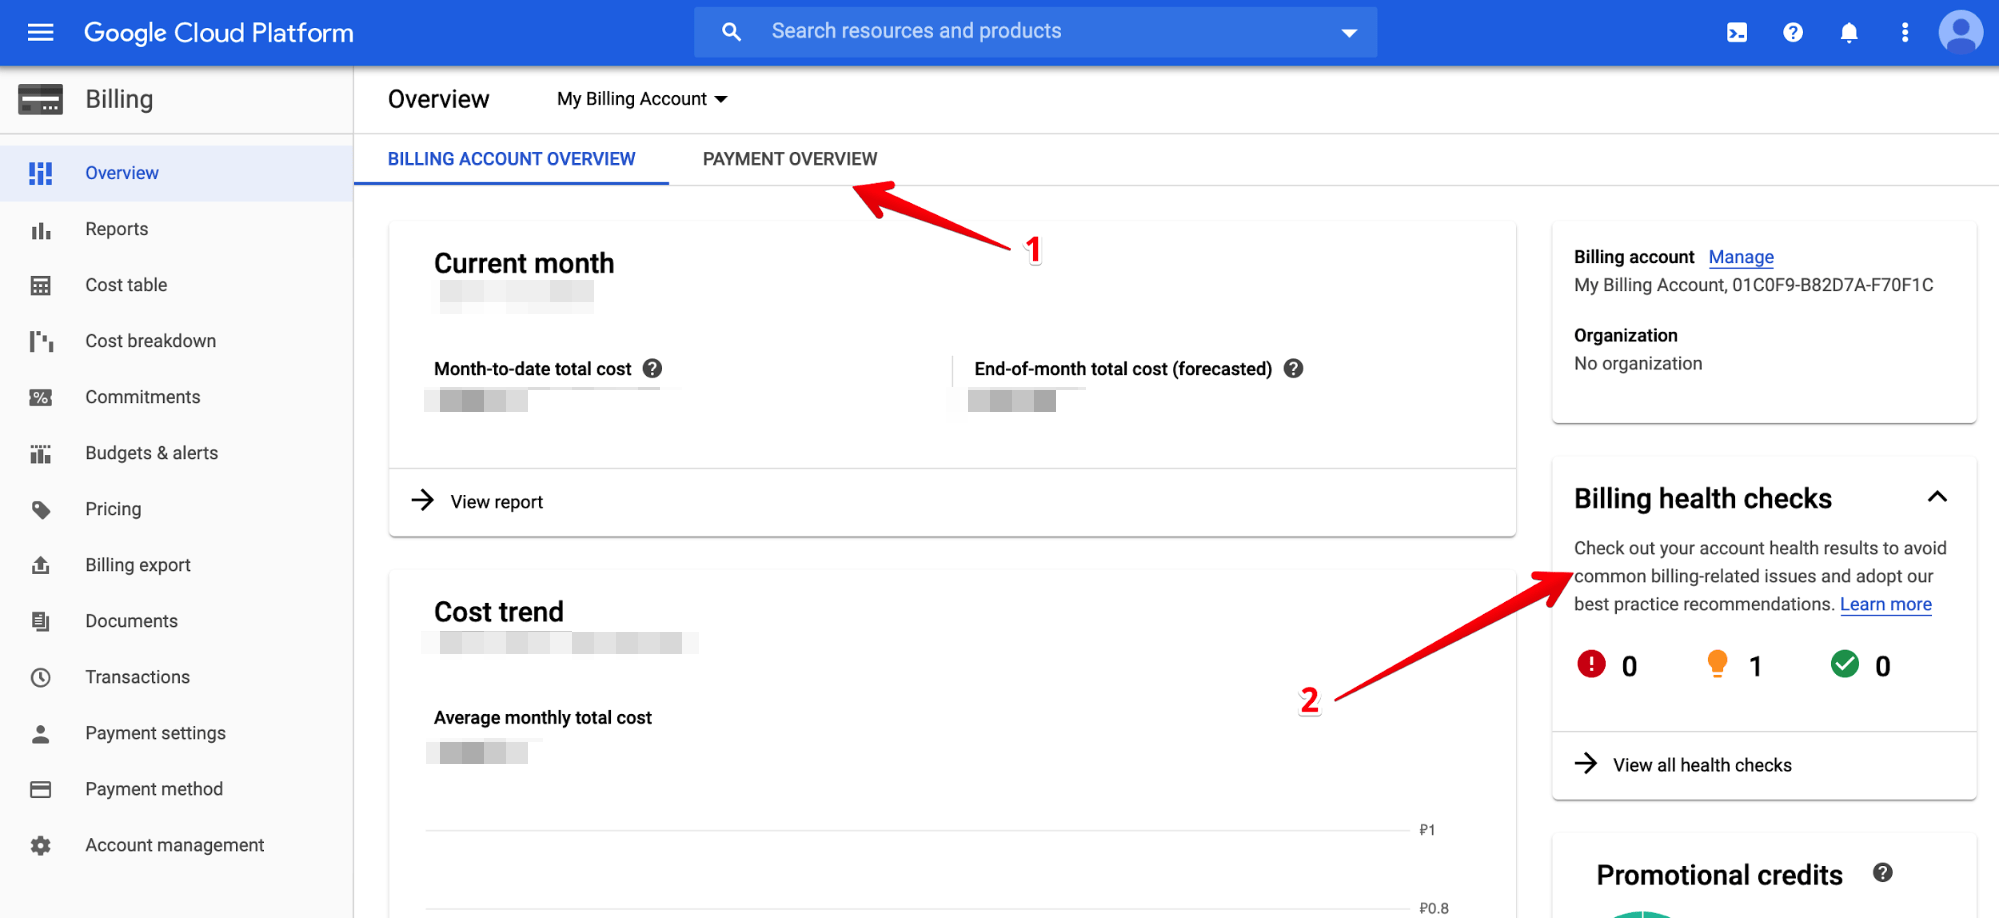
 Click on the account name and follow instructions to set the status to active if it is different.
 Validate your payment info (1) and check that you don't have any critical (red) billing health check issues (2).
 If you experience an issue with setting up a billing account [consult the documentation on billing accounts](https://cloud.google.com/billing/docs/how-to/manage-billing-account).
### 1.3 Create a Google Cloud project
Navigate to the [Manage resources](https://console.cloud.google.com/cloud-resource-manager?walkthrough_id=resource-manager--create-project) page in the Google Cloud console.
On the **Select organisation** drop-down list at the top of the page, select the organisation resource in which you want to create a project. If you are a free trial user, skip this step, as this list does not appear.
Click **Create Project**. In the **New Project** window that appears, enter a project name and select a billing account as applicable.
Enter the parent organisation or folder resource in the Location box. That resource will be the hierarchical parent of the new project. If No organisation is an option, you can select it to create your new project as the top level of its own resource hierarchy.
When you're finished entering new project details, click **Create**.
## Step 2. Set up GA4 BigQuery export
Once your Google Cloud project is ready, you need to link your Google Analytics 4 property to BigQuery so that event data is exported automatically.
### 2.1 Link your GA4 property to BigQuery
This process must be completed by a user with **Owner** access to the Google Cloud project. The Owner role is assigned to the user who created the project, but you can also grant this permission through the [Google Cloud Project IAM](https://console.cloud.google.com/iam-admin/iam) page.
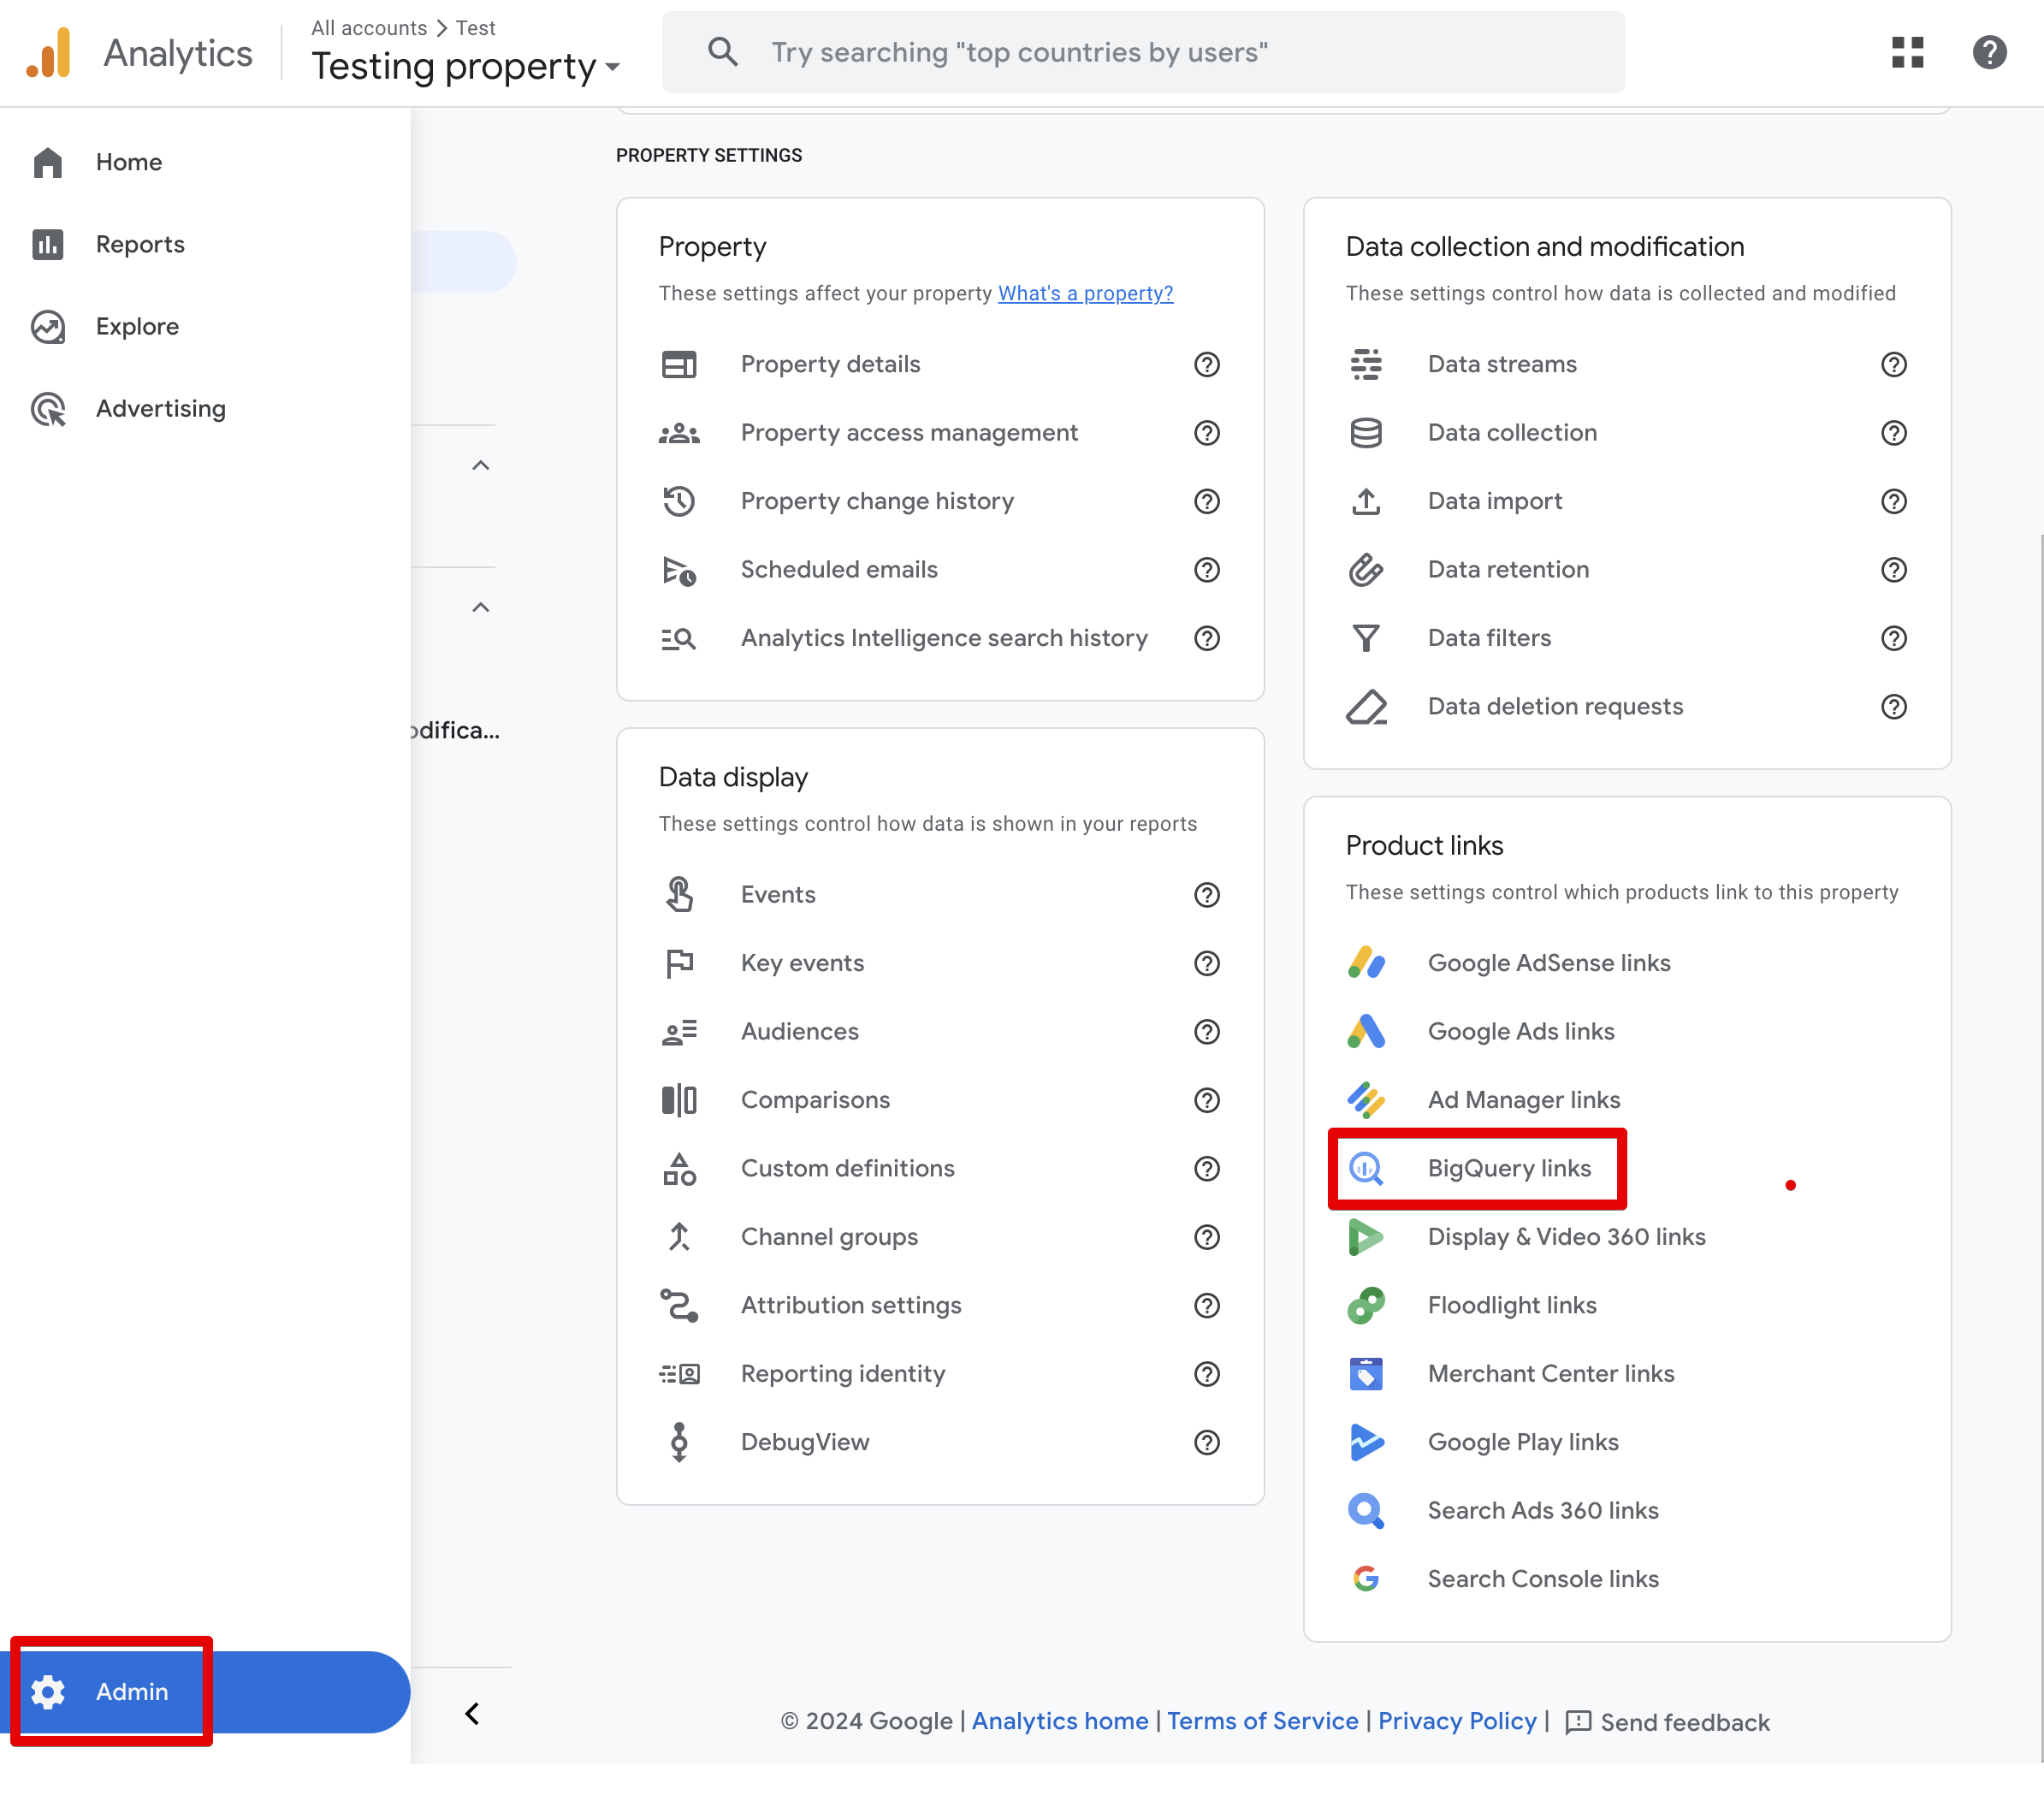
Go to [Google Analytics 4](https://analytics.google.com/) and select the property where your data is collected.
Click on the **Admin** button.
In the **Product Links** section, click **BigQuery links**.
If you experience an issue with setting up a billing account [consult the documentation on billing accounts](https://cloud.google.com/billing/docs/how-to/manage-billing-account).
### 1.3 Create a Google Cloud project
Navigate to the [Manage resources](https://console.cloud.google.com/cloud-resource-manager?walkthrough_id=resource-manager--create-project) page in the Google Cloud console.
On the **Select organisation** drop-down list at the top of the page, select the organisation resource in which you want to create a project. If you are a free trial user, skip this step, as this list does not appear.
Click **Create Project**. In the **New Project** window that appears, enter a project name and select a billing account as applicable.
Enter the parent organisation or folder resource in the Location box. That resource will be the hierarchical parent of the new project. If No organisation is an option, you can select it to create your new project as the top level of its own resource hierarchy.
When you're finished entering new project details, click **Create**.
## Step 2. Set up GA4 BigQuery export
Once your Google Cloud project is ready, you need to link your Google Analytics 4 property to BigQuery so that event data is exported automatically.
### 2.1 Link your GA4 property to BigQuery
This process must be completed by a user with **Owner** access to the Google Cloud project. The Owner role is assigned to the user who created the project, but you can also grant this permission through the [Google Cloud Project IAM](https://console.cloud.google.com/iam-admin/iam) page.
Go to [Google Analytics 4](https://analytics.google.com/) and select the property where your data is collected.
Click on the **Admin** button.
In the **Product Links** section, click **BigQuery links**.
 1. Click **Link** > **Choose a BigQuery project**.
2. Select the BigQuery project you created in Step 1.
3. Select the **Data location** that matches your business's region.
4. Enable both the **Daily** and **Streaming** export types.
5. Make sure no events are excluded.
6. Click **Submit**.
1. Click **Link** > **Choose a BigQuery project**.
2. Select the BigQuery project you created in Step 1.
3. Select the **Data location** that matches your business's region.
4. Enable both the **Daily** and **Streaming** export types.
5. Make sure no events are excluded.
6. Click **Submit**.
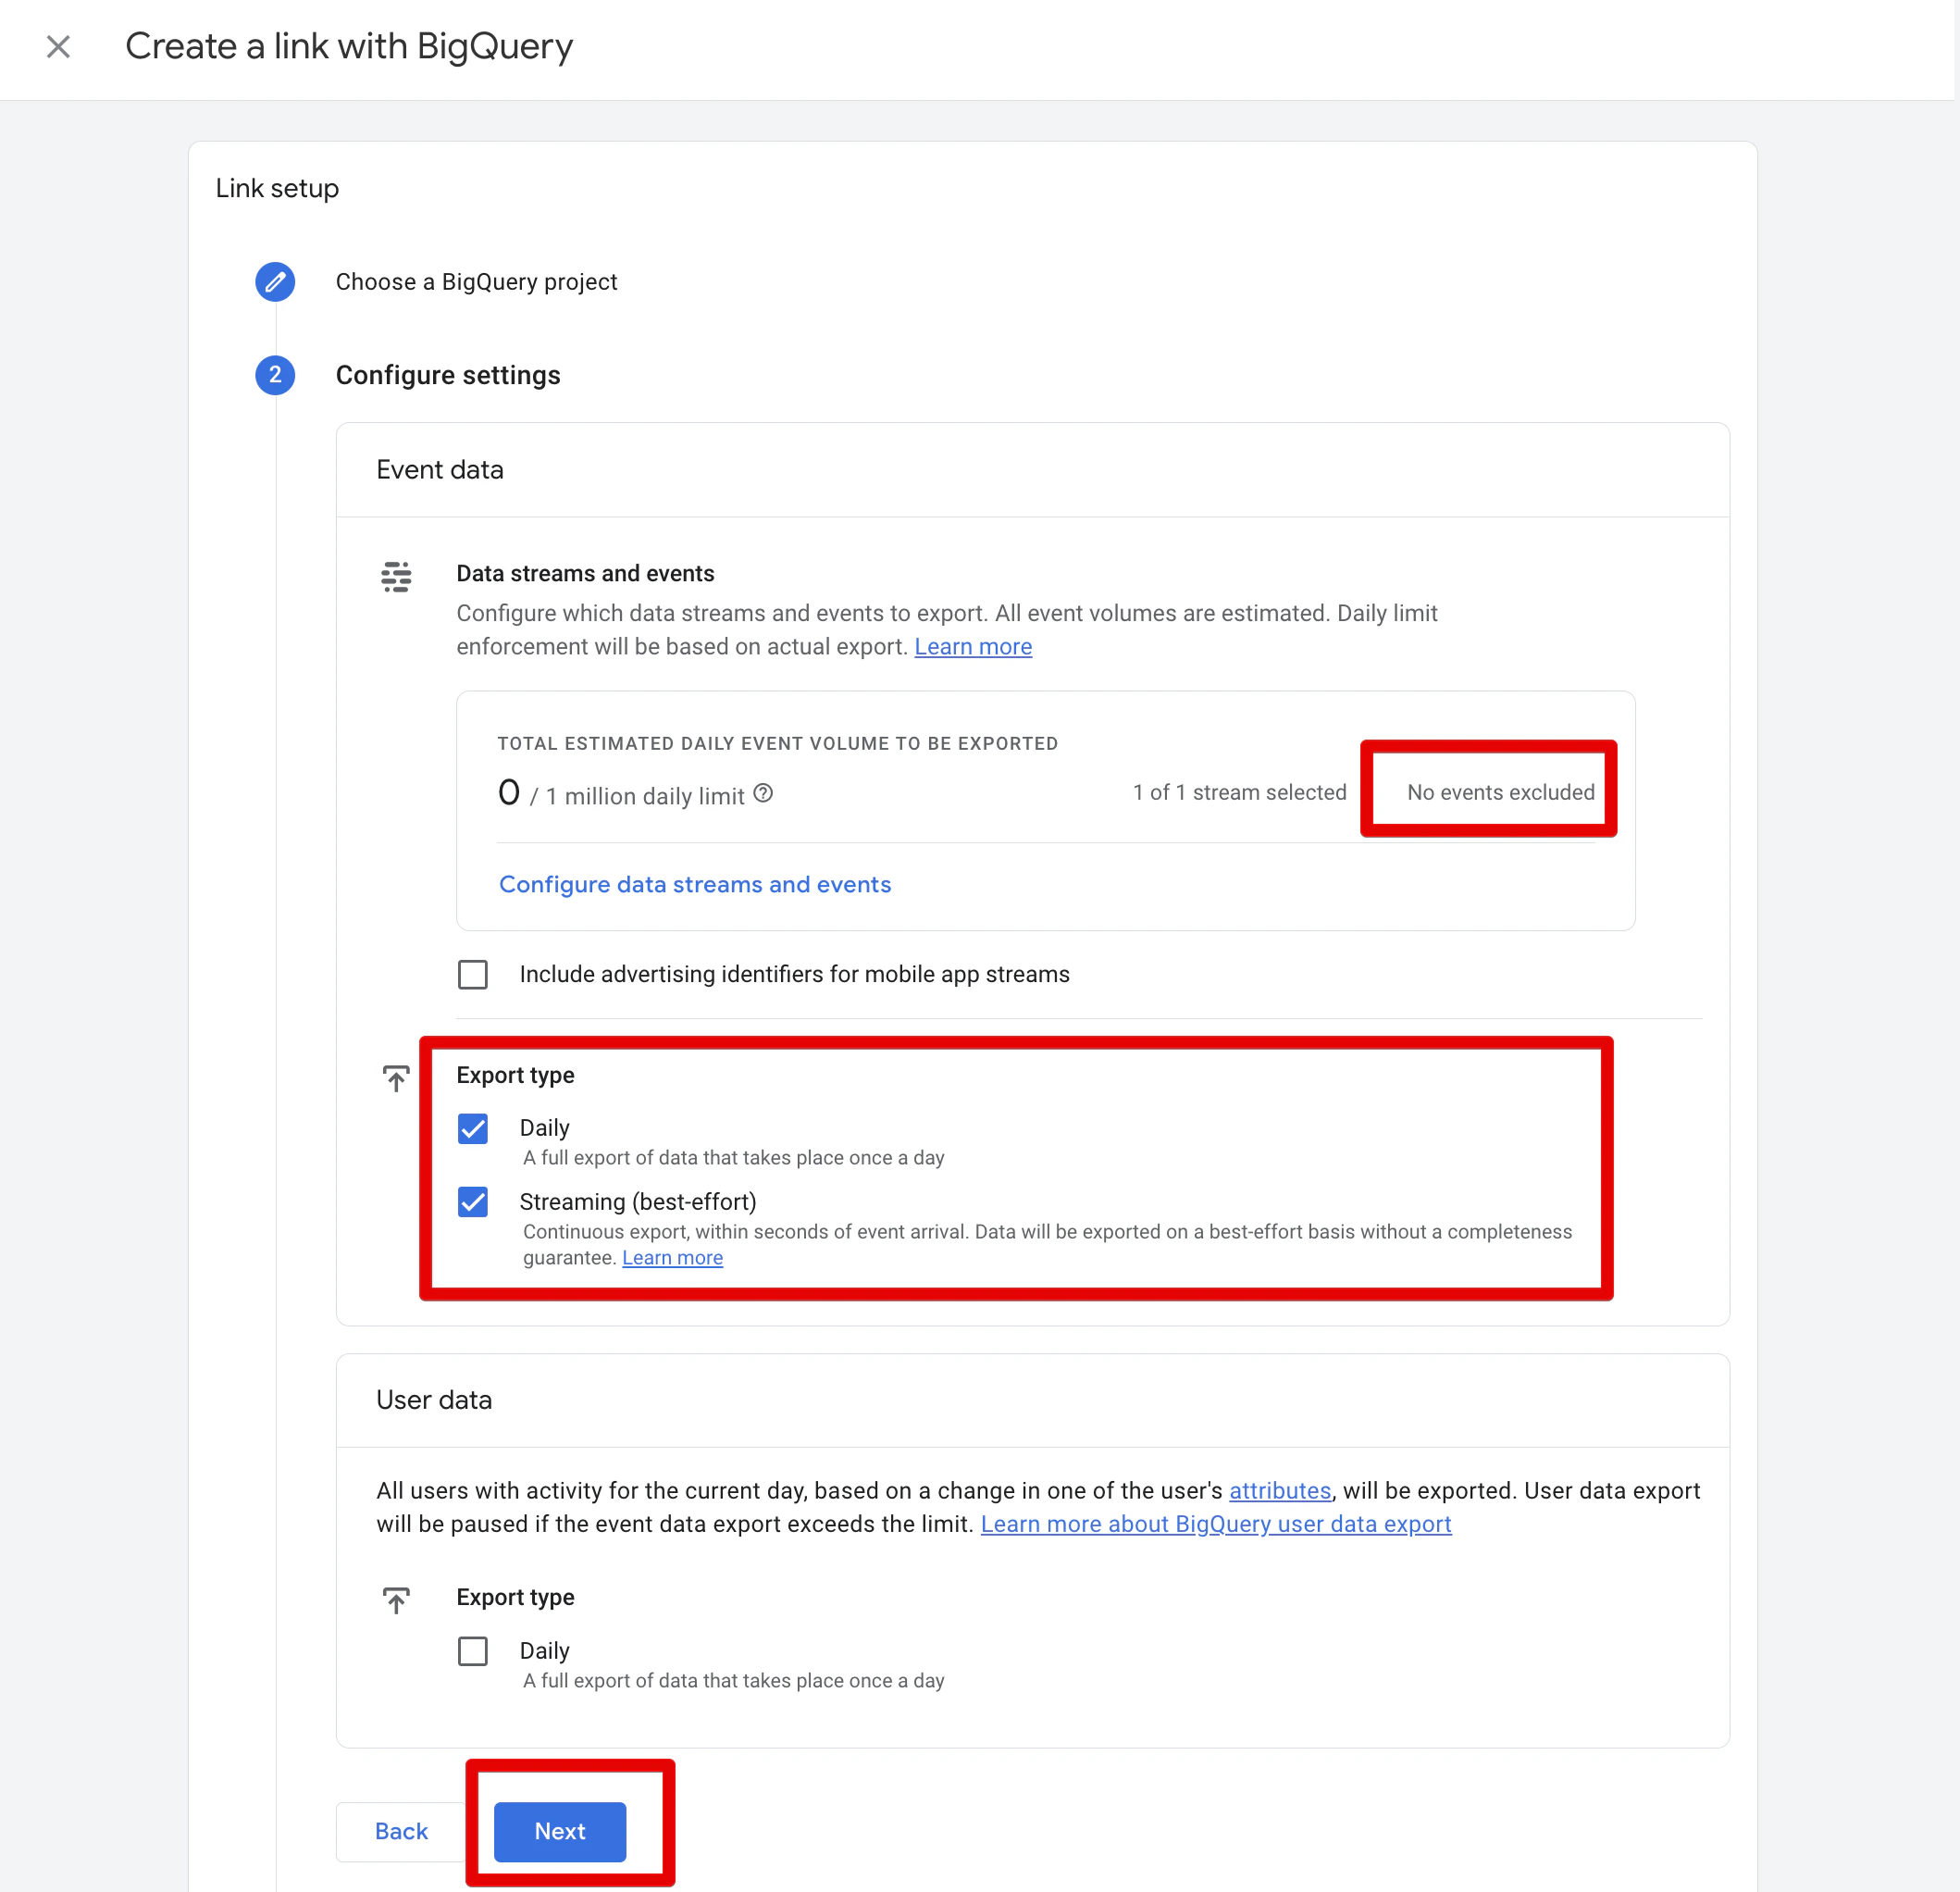 We recommend enabling both the **Daily** and **Streaming (best-effort)** export types. The daily export provides a complete dataset once per day, while the streaming export ensures near real-time data availability.
### 2.2 Verify the export
Once the GA4 BigQuery link is set up, data should start flowing to your BigQuery project within 24 hours. You can verify this by checking your BigQuery project for newly created GA4 event tables.
## What's next
Once you have completed the steps above, your environment is fully prepared. When you receive access to SegmentStream AI, you will be able to connect right away without any additional setup on the Google Cloud or GA4 side.
We recommend enabling both the **Daily** and **Streaming (best-effort)** export types. The daily export provides a complete dataset once per day, while the streaming export ensures near real-time data availability.
### 2.2 Verify the export
Once the GA4 BigQuery link is set up, data should start flowing to your BigQuery project within 24 hours. You can verify this by checking your BigQuery project for newly created GA4 event tables.
## What's next
Once you have completed the steps above, your environment is fully prepared. When you receive access to SegmentStream AI, you will be able to connect right away without any additional setup on the Google Cloud or GA4 side.